How to Build a 10-Foot Reach-In Closet From Four Sheets of Plywood
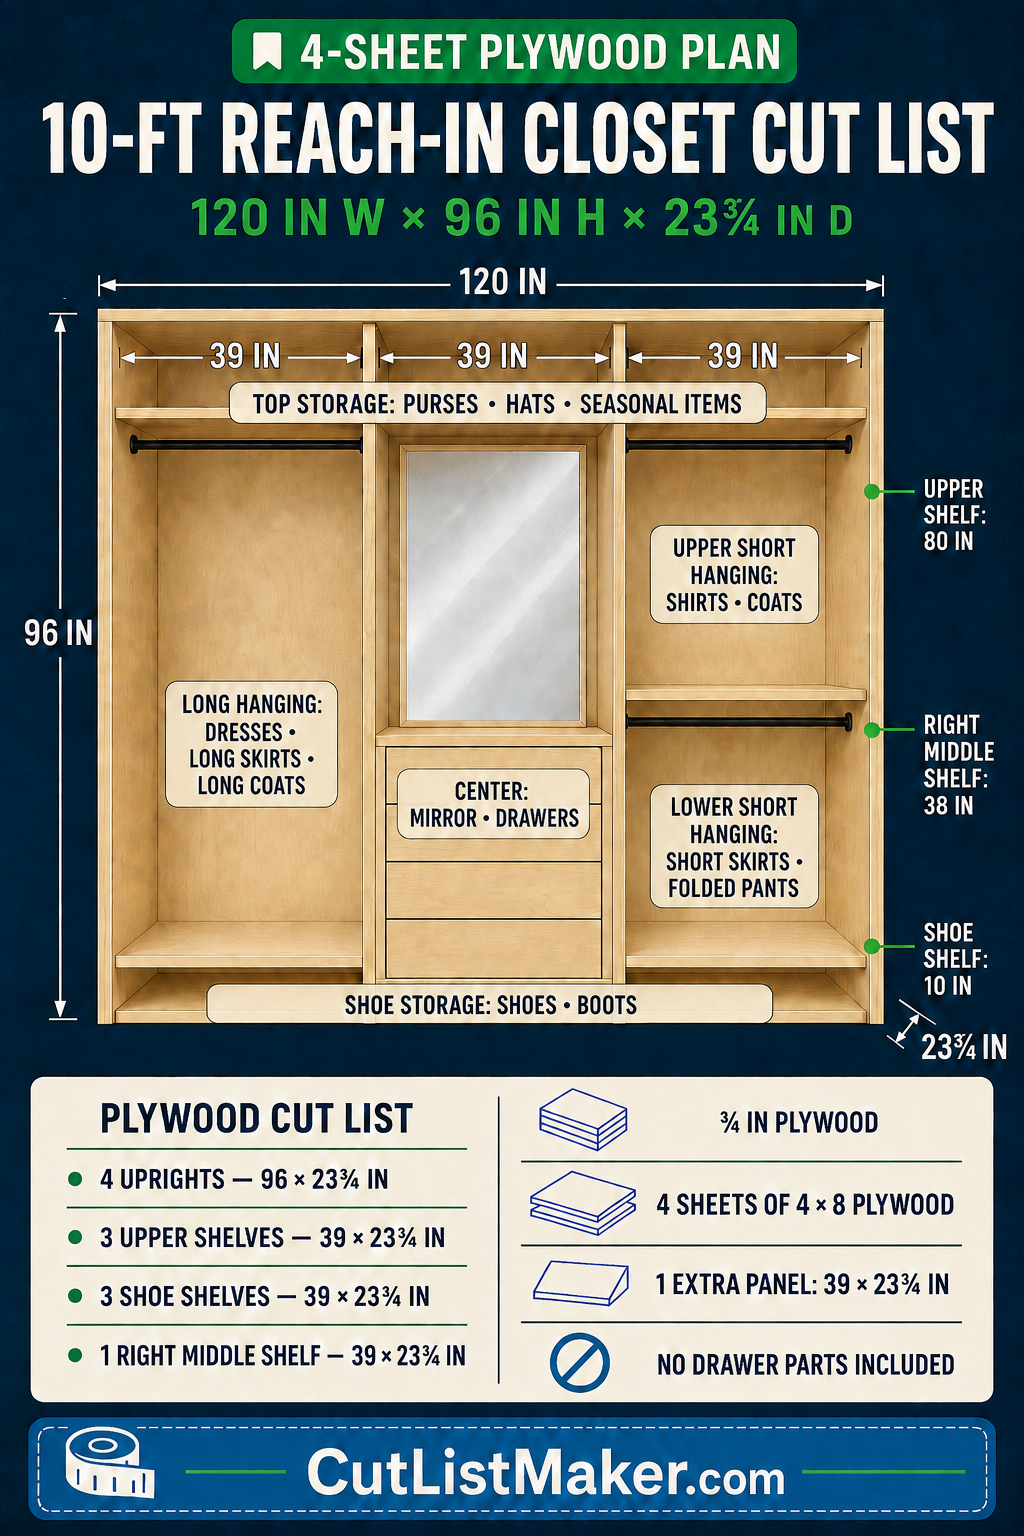
Ready to plan the cuts? Download the closet plan 📄 10-foot-reach-in-closet-cut-list, then use Import CSV at CutListMaker.com to load all 12 plywood parts at once.
A well-designed reach-in closet does more than add shelves. It gives long clothing room to hang, creates separate zones for shirts and shorter garments, moves shoes off the floor, and puts seasonal items where they are easy to find but out of the way.
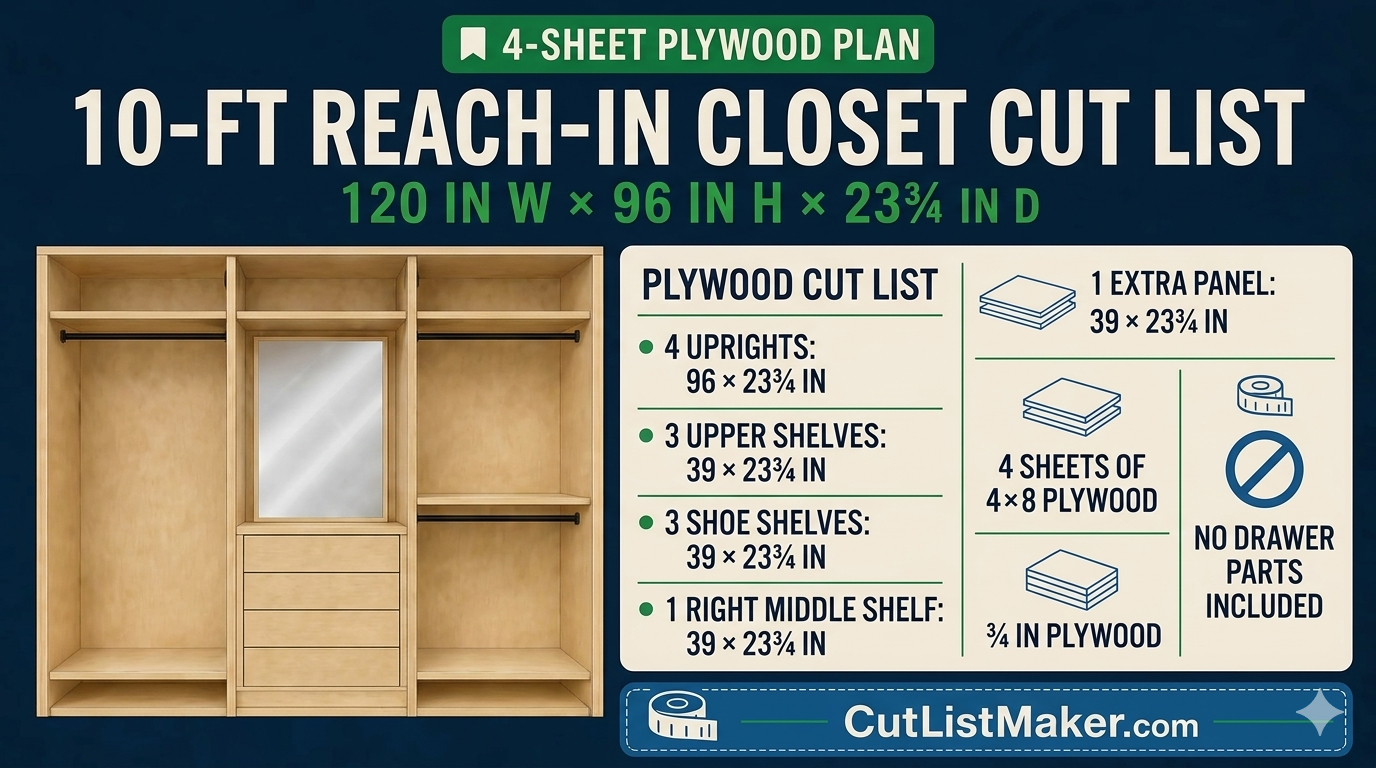
This plan creates a built-in closet organizer that is 120 inches wide, 96 inches high, and 23 3/4 inches deep. Four full-height plywood uprights divide the closet into three equal 39-inch-wide bays:
- A long-hanging section for dresses, long skirts, and long coats
- A center section for a mirror and a separate drawer unit
- Two short-hanging sections for shirts, coats, short skirts, and folded pants
- Upper shelves for purses, hats, and seasonal storage
- Lower shelves for shoes and boots
The organizer requires only four standard 4-by-8 sheets of 3/4-inch plywood when the parts are planned at 23 3/4 inches deep. The design also leaves enough material for one optional extra shelf panel.
Before making the first cut, enter the parts into CutListMaker. CutListMaker will arrange the panels on the plywood, account for your blade kerf, label the parts, and produce a more practical cutting sequence for a track saw or table saw.
Important: This is a built-in organizer, not a freestanding cabinet. The plan uses the existing walls as the back and the existing floor and ceiling as the lower and upper boundaries. It does not include plywood for a back, top, bottom, or drawer box.
Finished Closet Dimensions
| Measurement | Finished dimension |
|---|---|
| Overall width | 120 in. |
| Nominal overall height | 96 in. |
| Finished panel depth | 23 3/4 in. |
| Plywood thickness | 3/4 in. |
| Number of clear bays | 3 |
| Clear width of each bay | 39 in. |
| Upper shelf elevation | 80 in. |
| Right middle shelf elevation | 38 in. |
| Shoe shelf elevation | 10 in. |
The three equal openings work because the four plywood uprights consume a total of 3 inches:
120 in. - (4 x 3/4 in.) = 117 in.
Divide the remaining 117 inches by three and each clear bay is exactly 39 inches wide:
117 in. / 3 = 39 in.
Measure the Actual Closet Before Cutting
Do not assume an opening described as 10 feet by 8 feet is exactly 120 by 96 inches. Drywall corners may not be square, floors can slope, and ceilings can vary from one side of the closet to the other.
Measure the opening in several places:
- Measure the width at the floor, middle, and ceiling.
- Measure the height at the left wall, center, and right wall.
- Check both side walls and the back wall with a long level.
- Mark the locations of wall studs.
- Check for outlets, plumbing, HVAC, or wiring before planning fasteners.
Use the smallest measured width and height when adapting the plan.
A practical adjustment for the full-height uprights
The published cut list shows 96-inch uprights because that is the nominal finished height of the design. A 96-inch panel can be difficult or impossible to stand upright beneath a ceiling that is also exactly 96 inches high.
If the smallest floor-to-ceiling measurement is 96 inches, cut the uprights approximately 95 1/2 to 95 3/4 inches long so they can be tilted into position. A small top filler or trim strip can conceal the installation gap. Update the upright length in CutListMaker before generating the final cutting plan.
The shelf elevations in this article are measured from the finished floor and do not change when a small installation clearance is added above the uprights.
Why the Plan Uses a 23 3/4-Inch Depth
A sheet of plywood is nominally 48 inches wide. Two exact 24-inch pieces already total 48 inches, leaving no room for the saw blade. Once the blade removes approximately 1/8 inch of material, two full 24-inch strips will not fit across the sheet.
Reducing the finished depth to 23 3/4 inches solves the problem:
- Two finished strips use 47 1/2 inches of plywood.
- The 1/8-inch kerf is accounted for during each rip.
- There is still enough material for a narrow cleanup margin.
- Each sheet can provide two full-depth closet parts instead of one.
That small 1/4-inch reduction is almost impossible to notice in the finished closet, but it reduces the plywood requirement from approximately eight sheets to four.
Complete Plywood Cut List
This cut list assumes the shelves are installed between the uprights with cleats, pocket screws, confirmat screws, or another butt-joint method. It does not include extra length for dado joinery.
| Part | Quantity | Length | Width/depth | Purpose |
|---|---|---|---|---|
| Full-height upright | 4 | 96 in.* | 23 3/4 in. | Two outside panels and two interior dividers |
| Upper shelf | 3 | 39 in. | 23 3/4 in. | One shelf above each bay |
| Shoe shelf | 3 | 39 in. | 23 3/4 in. | One shelf at the bottom of each bay |
| Right middle shelf | 1 | 39 in. | 23 3/4 in. | Divides the right bay into two hanging zones |
| Optional spare panel | 1 | 39 in. | 23 3/4 in. | Extra shelf, replacement panel, or later modification |
\*Field-measure the height before cutting. Use 95 1/2 to 95 3/4 inches if installation clearance is required beneath a true 96-inch ceiling.
The finished organizer uses 11 plywood parts: four uprights and seven shelves. The optional spare panel is a twelfth part that fits within the same four-sheet plan.
Sheet-by-Sheet Plywood Plan
The following layout assumes four 48-by-96-inch sheets and a 1/8-inch blade kerf.
Sheet 1
- Two full-height uprights at 96 by 23 3/4 inches
Sheet 2
- Two full-height uprights at 96 by 23 3/4 inches
Sheet 3
- Four shelf panels at 39 by 23 3/4 inches
Sheet 4
- Three required shelf panels at 39 by 23 3/4 inches
- One optional spare panel at 39 by 23 3/4 inches
Each 96-inch strip can produce two 39-inch shelves. After the crosscuts and kerf are accounted for, approximately 17 3/4 inches remains at the end of each strip. Save those offcuts for test cuts, blocking, small cleats, or future repairs.
Enter the Project in CutListMaker
Planning the project digitally before cutting helps prevent one incorrect rip from ruining an entire sheet. It also gives you a labeled diagram that is easier to follow when several panels share similar dimensions.
Open CutListMaker and create a new plywood project.
1. Set the project options
Use these settings:
| CutListMaker setting | Value |
|---|---|
| Units | Inches |
| Kerf thickness | 0.125 in. |
| Stock-sheet length | 96 in. |
| Stock-sheet width | 48 in. |
| Stock-sheet quantity | 4 |
| Cutting method | Track Saw or Table Saw |
| Respect wood grain | On |
| Labels on panels | On |
| Show cut dimensions | On |
| Save scraps | On |
If you know the price of your plywood, enter the cost of each sheet. CutListMaker can then show the total sheet cost, the material allocated to your parts, and the estimated value of the waste.
2. Add the plywood parts
Enter the following parts:
| Part name | Length | Width | Quantity |
|---|---|---|---|
| Upright | 96 in.* | 23.75 in. | 4 |
| Upper Shelf | 39 in. | 23.75 in. | 3 |
| Shoe Shelf | 39 in. | 23.75 in. | 3 |
| Right Middle Shelf | 39 in. | 23.75 in. | 1 |
| Optional Spare Shelf | 39 in. | 23.75 in. | 1 |
\*Change the upright length to your verified field measurement when necessary.
3. Generate the cutting layout
Select Make Cuts and review the project overview. The completed plan should use four sheets and show no unplaced panels.
Before cutting, confirm all of the following:
- Four uprights are included.
- Eight shelf-size pieces are included when the optional spare is selected.
- Every part is 23.75 inches deep.
- The plywood grain runs vertically on the uprights and front-to-back consistently across matching shelves.
- No panel is shown as unplaced.
- The selected cutting method matches the saw you intend to use.
Save, print, or copy the generated cutting steps and keep them near the saw. Label each part immediately after it is cut.
Materials and Hardware
Plywood and finishing materials
- Four sheets of 3/4-inch cabinet-grade plywood
- Approximately 65 linear feet of matching edge banding, including a small allowance for mistakes
- Wood filler appropriate for the selected finish
- Sandpaper in approximately 120-, 180-, and 220-grit
- Paint, clear finish, or stain-compatible topcoat
Birch plywood is a good choice for a clear-coated organizer. A smooth paint-grade plywood is often easier to finish when the closet will be painted.
Closet and installation hardware
- Three closet rods
- Six matching rod sockets or brackets
- Cabinet or structural screws long enough to reach wall studs
- Shelf-support cleats, pocket screws, confirmat screws, or other selected shelf fasteners
- Shims
- Optional 1-by-2 hardwood or plywood front stiffeners for heavily loaded shelves
- Drawer unit sized to fit inside the 39-inch center opening
- Mirror sized for the space above the drawer unit
- Optional base and top trim
Do not cut the closet rods to 39 inches automatically. Install the plywood first, measure the actual distance between panels, and subtract the allowance required by the selected rod sockets.
Recommended Tools
- CutListMaker cutting plan
- Track saw with guide rail or table saw with adequate infeed and outfeed support
- Circular saw for field adjustments
- Drill and impact driver
- Stud finder
- Tape measure
- Long level or laser level
- Framing square and combination square
- Clamps
- Pocket-hole jig or confirmat-bit system if using those fasteners
- Router or iron for edge banding, depending on the banding type
- Random-orbit sander
- Hearing protection, eye protection, and a respirator or dust mask
Full sheets of 3/4-inch plywood are heavy and awkward. Use a helper, a panel cart, or a foam-board cutting platform rather than trying to control a full sheet unsupported.
Understanding the Closet Layout
The organizer contains four vertical uprights and three 39-inch clear openings.
Measured from the left side of the finished 120-inch-wide unit, the nominal panel positions are:
| Panel | Left-edge position |
|---|---|
| Left outside upright | 0 in. |
| First interior upright | 39 3/4 in. |
| Second interior upright | 79 1/2 in. |
| Right outside upright | 119 1/4 in. |
These positions produce three clear openings of 39 inches after the 3/4-inch panel thicknesses are included.
Use these measurements as layout targets, not substitutes for field measurements. If the actual opening is slightly narrower or wider, maintain equal bays or assign the extra space to the long-hanging section.
Vertical shelf positions
Mark shelf positions from the finished floor to the top surface of each shelf:
| Shelf | Top-surface elevation |
|---|---|
| Shoe shelves | 10 in. |
| Right middle shelf | 38 in. |
| Upper shelves | 80 in. |
This creates the intended nominal storage zones:
- 10 inches for shoe storage
- 70 inches between the shoe-shelf and upper-shelf elevations in the long-hanging bay
- 28 inches between the shoe shelf and middle shelf in the lower-right section
- 42 inches between the right middle shelf and upper shelf
- 16 inches between the upper-shelf surface and a 96-inch ceiling
Because each shelf is 3/4 inch thick, the actual clear opening below the next shelf is 3/4 inch less than the surface-to-surface elevation. Adjust a shelf or rod before installation if a specific garment needs additional clearance.
Step-by-Step: Cut the Plywood
Step 1: Inspect and label the sheets
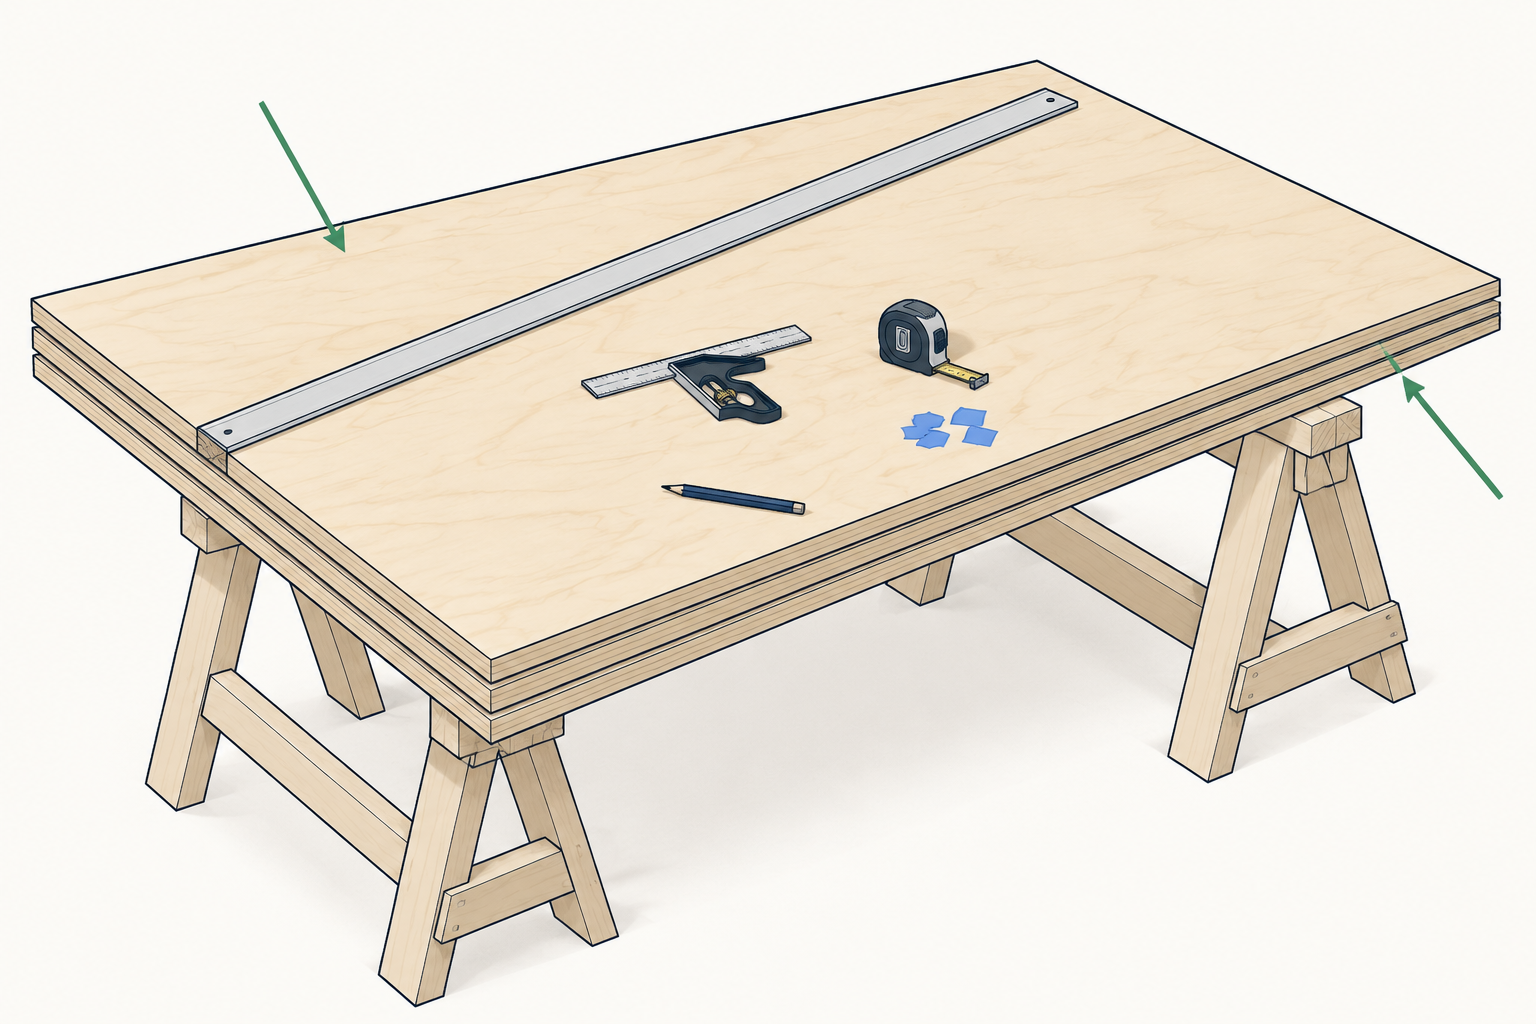
Choose the best face of each plywood sheet and mark it with painter's tape. Decide which edges will face the front of the closet. Keep the face-grain direction consistent across the four uprights.
Check the sheets for bowing or damage. Use the straightest sheets for the full-height uprights.
Step 2: Support the plywood safely
Place each sheet on a large sacrificial foam board or a stable cutting table. If using a track saw, set the blade only slightly deeper than the plywood. Connect dust collection when available.
Step 3: Rip the sheets to 23 3/4 inches
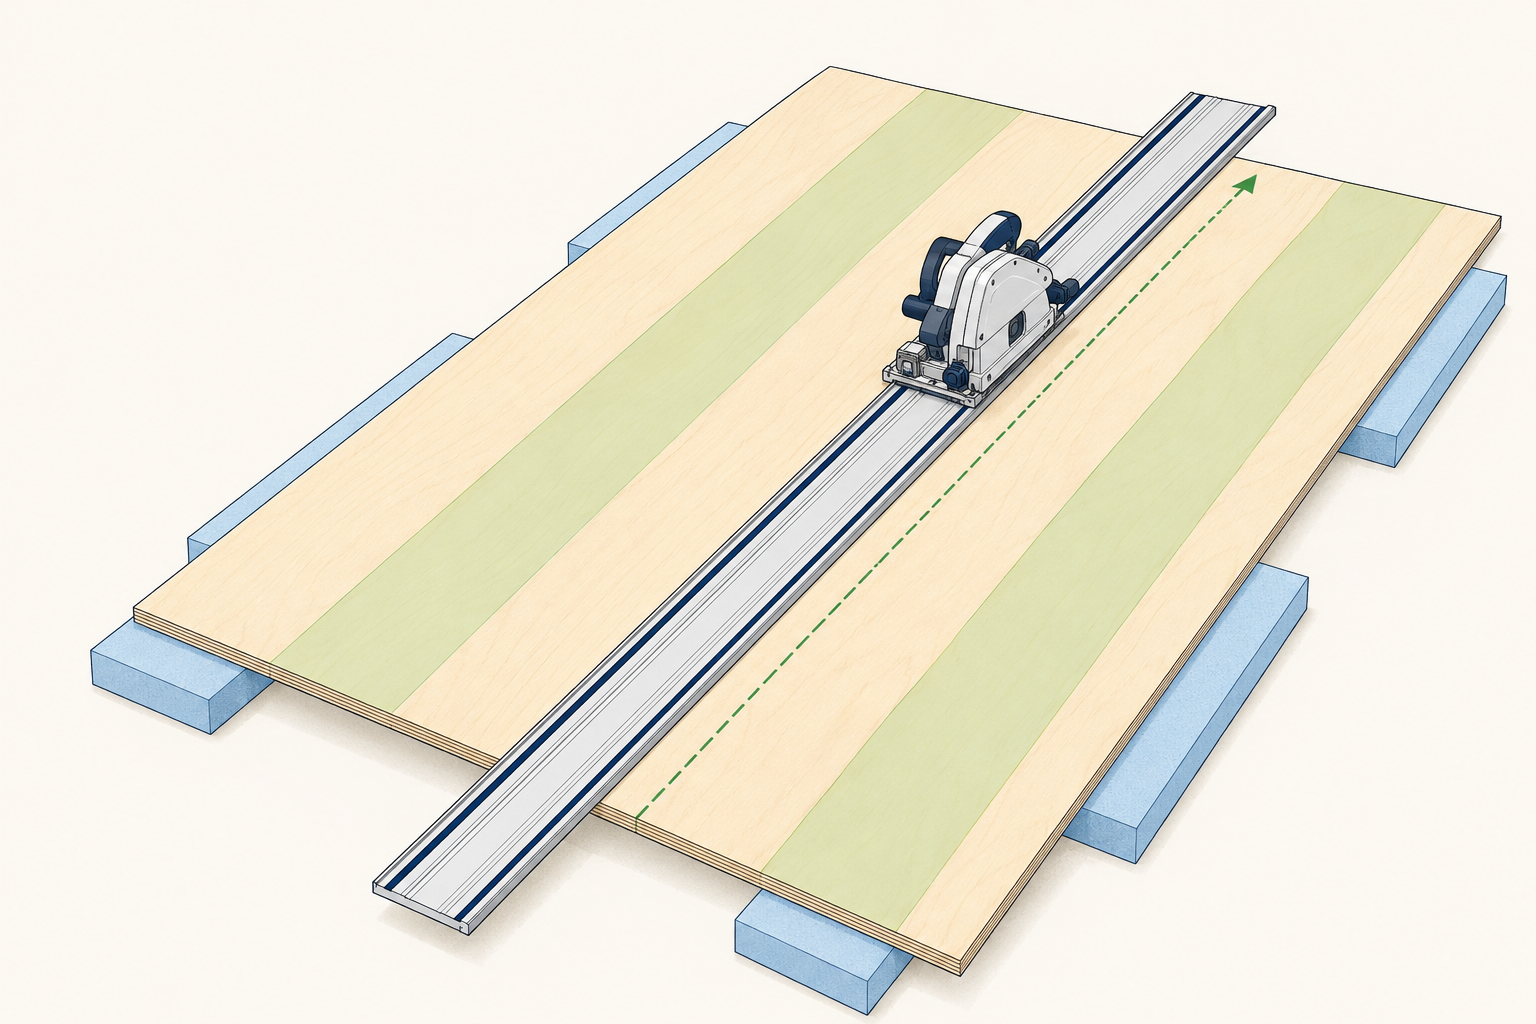
Follow the CutListMaker diagram and rip two 23 3/4-inch-wide strips from each sheet. Make sure the saw kerf falls on the waste side of every cut.
The strips from Sheets 1 and 2 become the four uprights. The strips from Sheets 3 and 4 become shelves.
Step 4: Cut the shelf strips to length
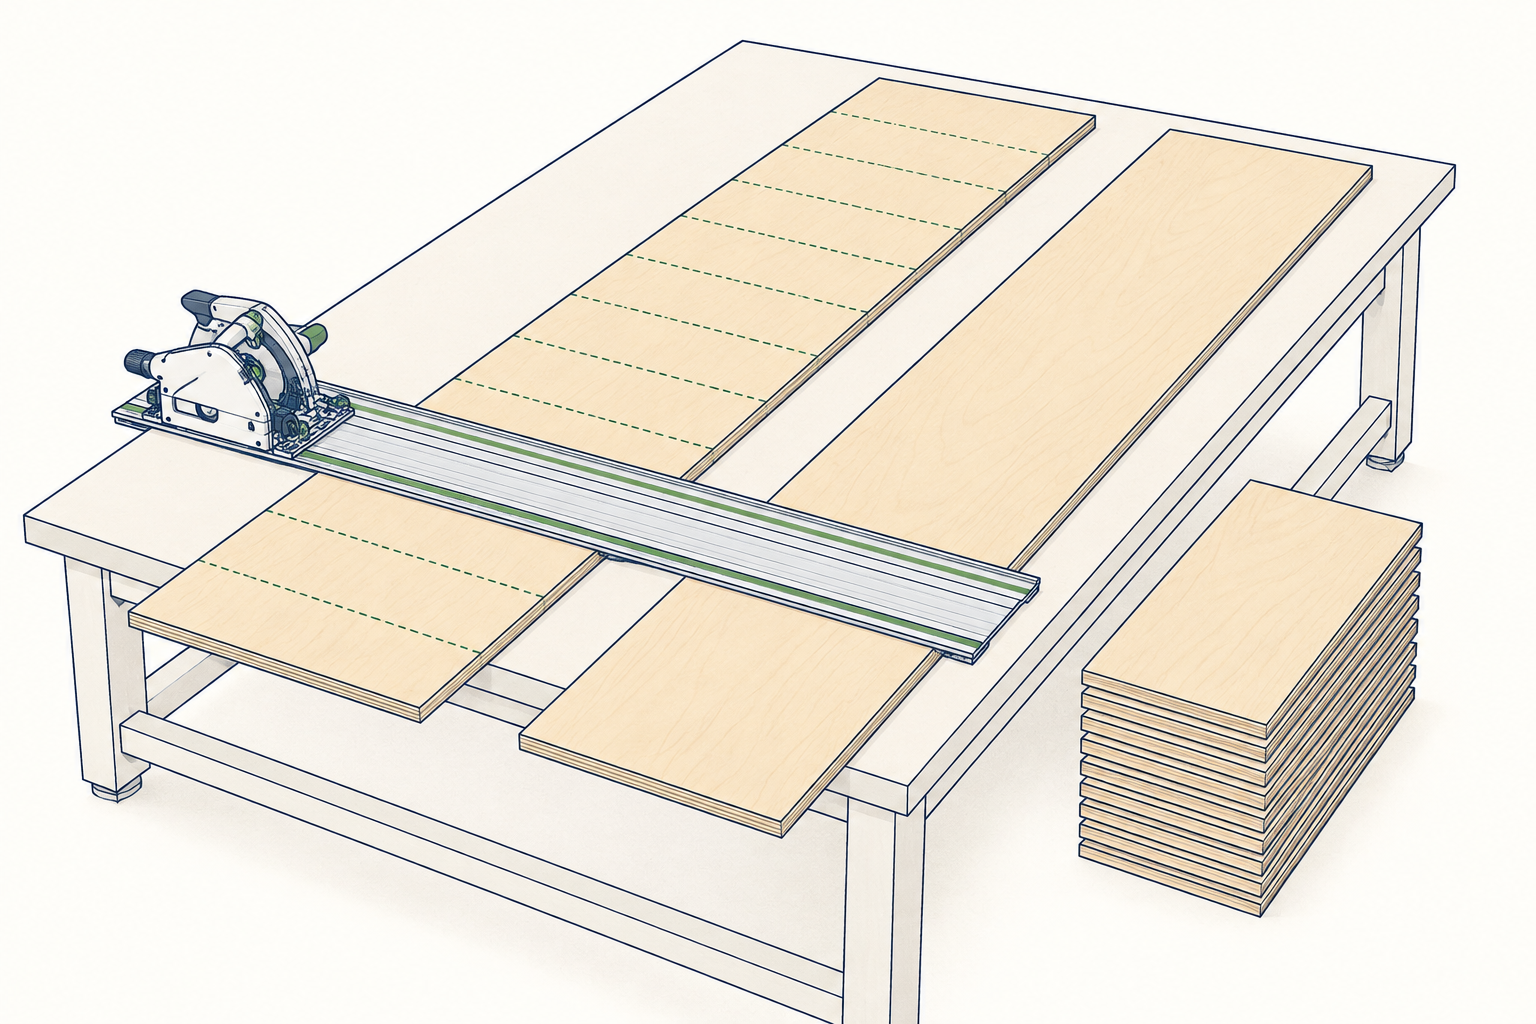
Crosscut the four shelf strips into 39-inch pieces. Each strip produces two shelf panels. Cut seven required shelves and, if desired, the eighth panel as a spare.
Use a square guide or track-saw rail so every shelf has square ends. Unequal or out-of-square shelves will make it difficult to keep the uprights plumb.
Step 5: Label every part
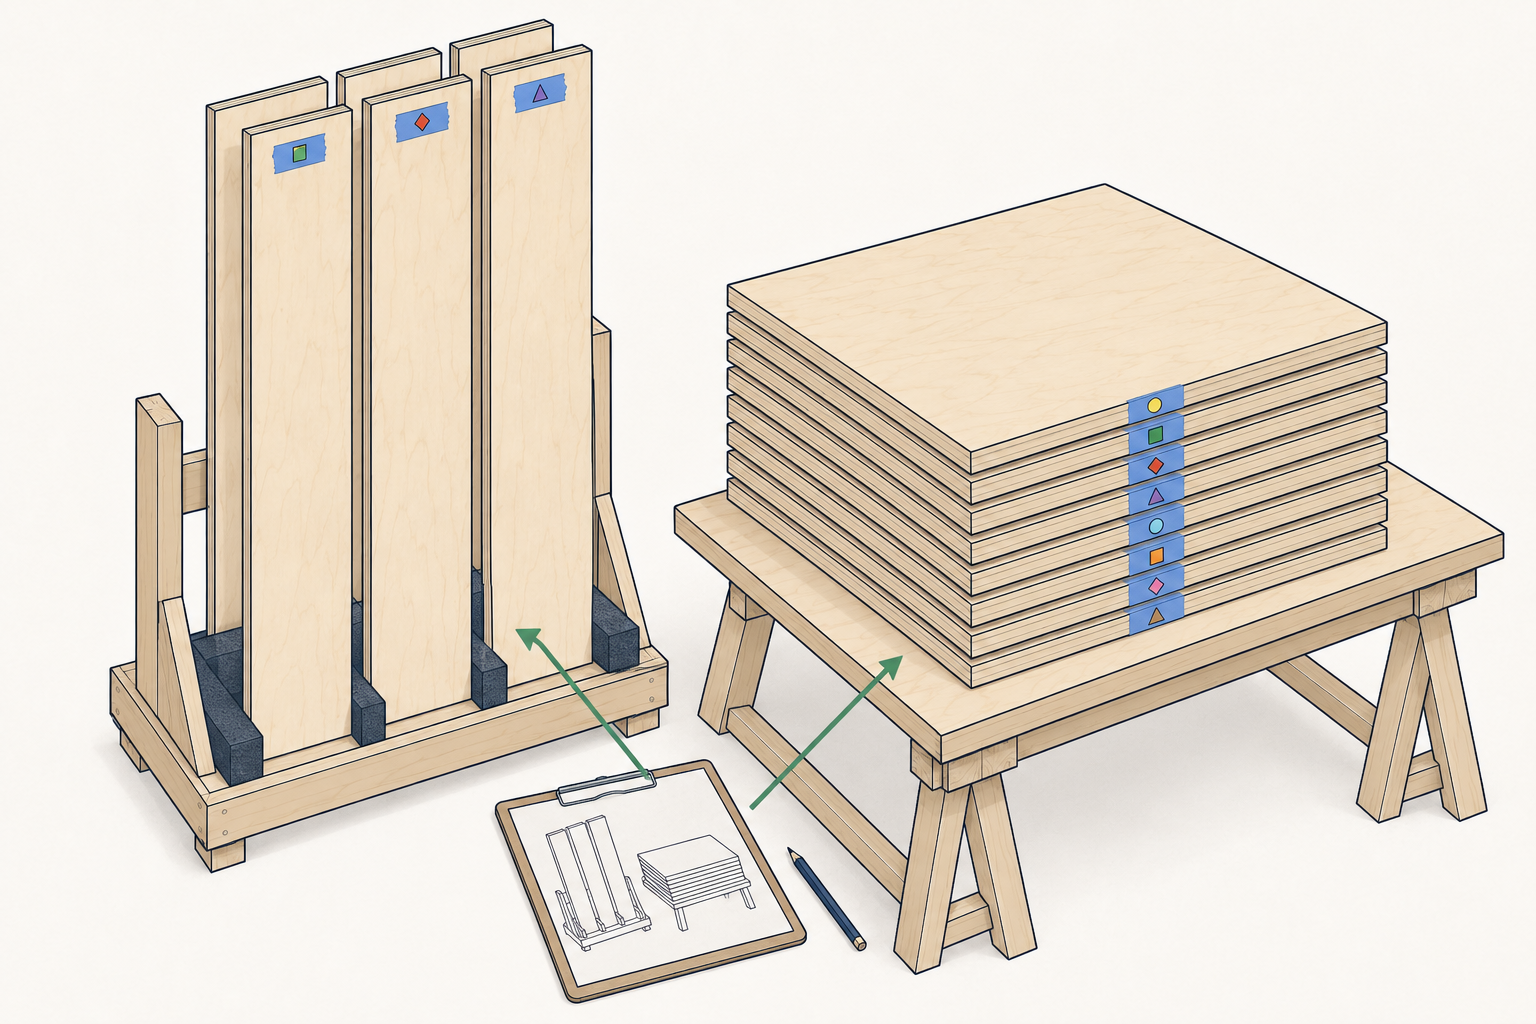
Use painter's tape to label the four uprights and each shelf:
- Left Outside Upright
- Interior Upright 1
- Interior Upright 2
- Right Outside Upright
- Upper Shelf 1, 2, and 3
- Shoe Shelf 1, 2, and 3
- Right Middle Shelf
- Spare Shelf
Mark the front edge and preferred face of every panel. This prevents the grain direction or finished face from being reversed during assembly.
Prepare the Plywood Before Installation
Dry-fit the parts
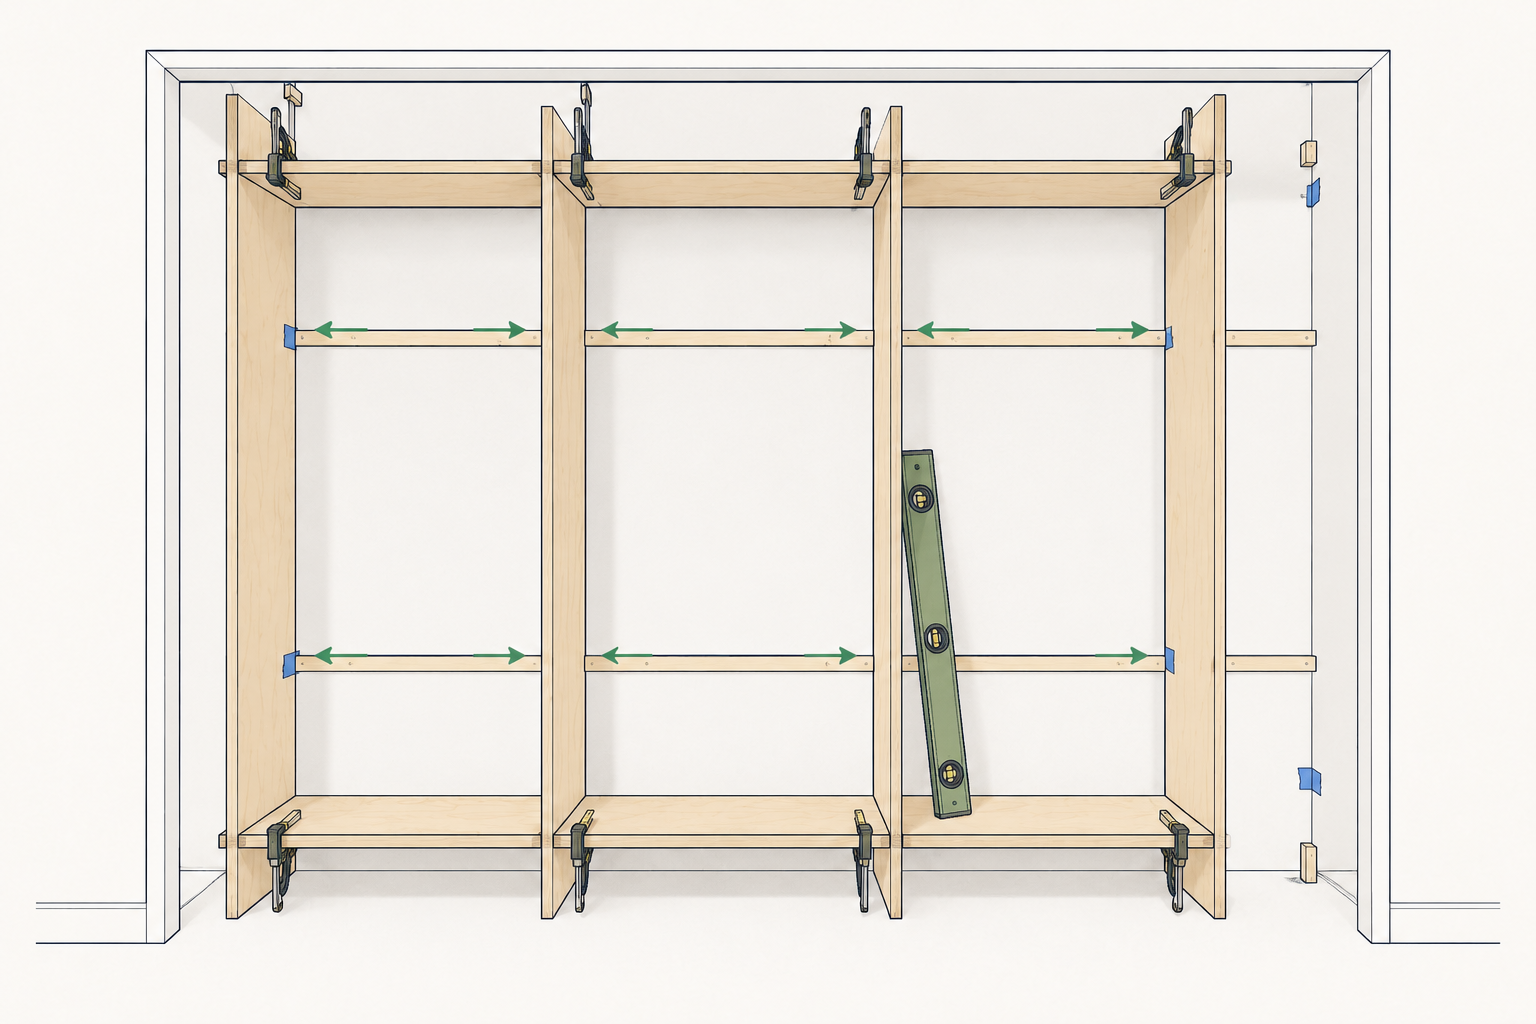
Stand the uprights in the closet and test the shelf fit before applying finish. Walls are rarely perfectly parallel, so one bay may require a shelf to be trimmed slightly.
If a shelf binds, trim only the amount required. A gap of approximately 1/16 inch is easier to conceal than damage caused by forcing a panel between two uprights.
Apply edge banding
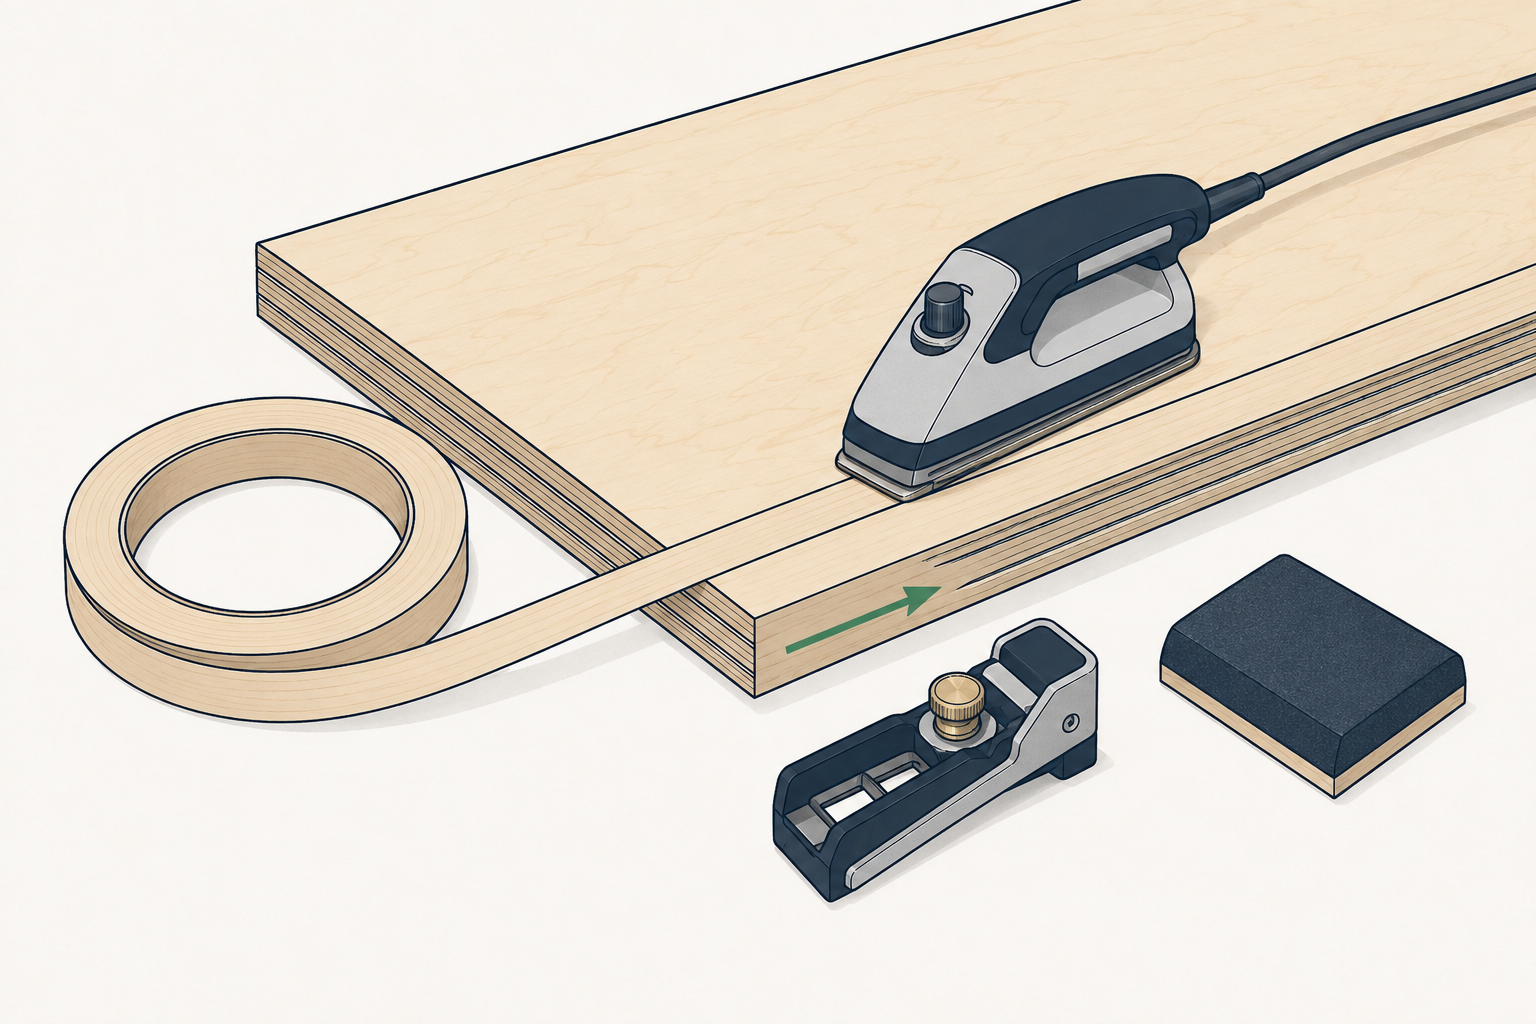
Apply edge banding to every exposed front edge:
- Front edge of all four uprights
- Front edge of the three upper shelves
- Front edge of the three shoe shelves
- Front edge of the right middle shelf
- Front edge of the optional spare shelf if it will be used
Trim the banding flush, lightly break the sharp edges, and inspect for loose areas.
Sand and finish
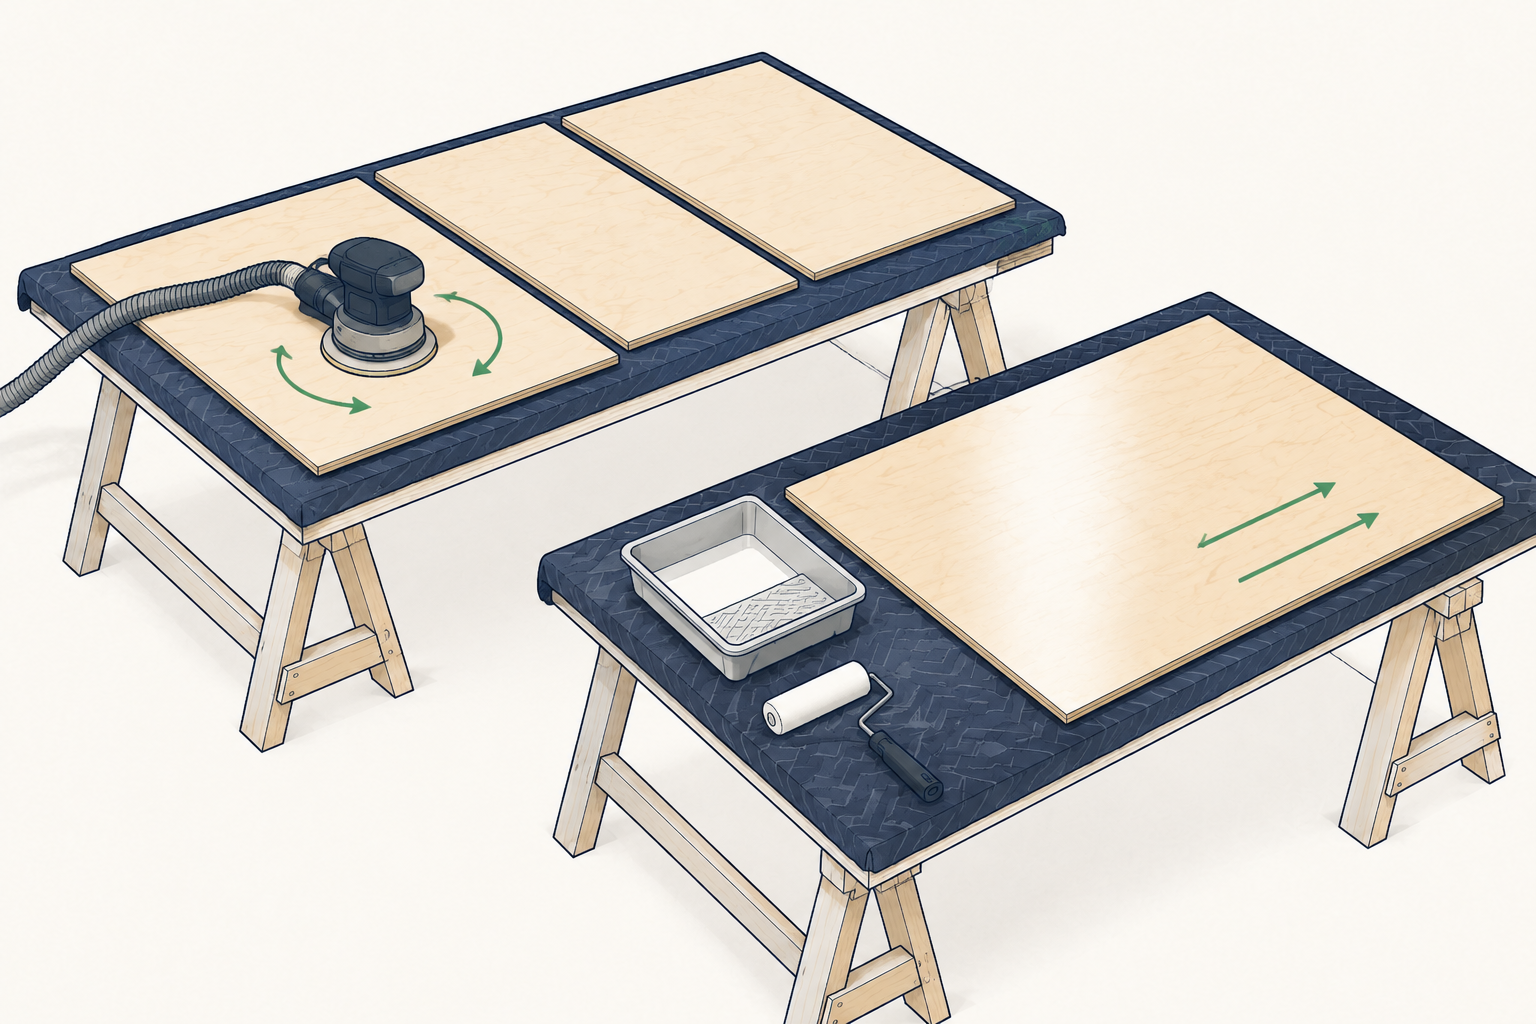
Sand the plywood faces without cutting through the thin face veneer. A typical sequence is 120 grit followed by 180 grit. Use 220 grit between finish coats when required by the finish manufacturer.
Finishing the parts before installation is usually easier than painting or clear-coating inside the completed closet. Keep finish out of joints that will be glued.
Step-by-Step: Install the Closet Organizer
Step 1: Mark studs and reference lines
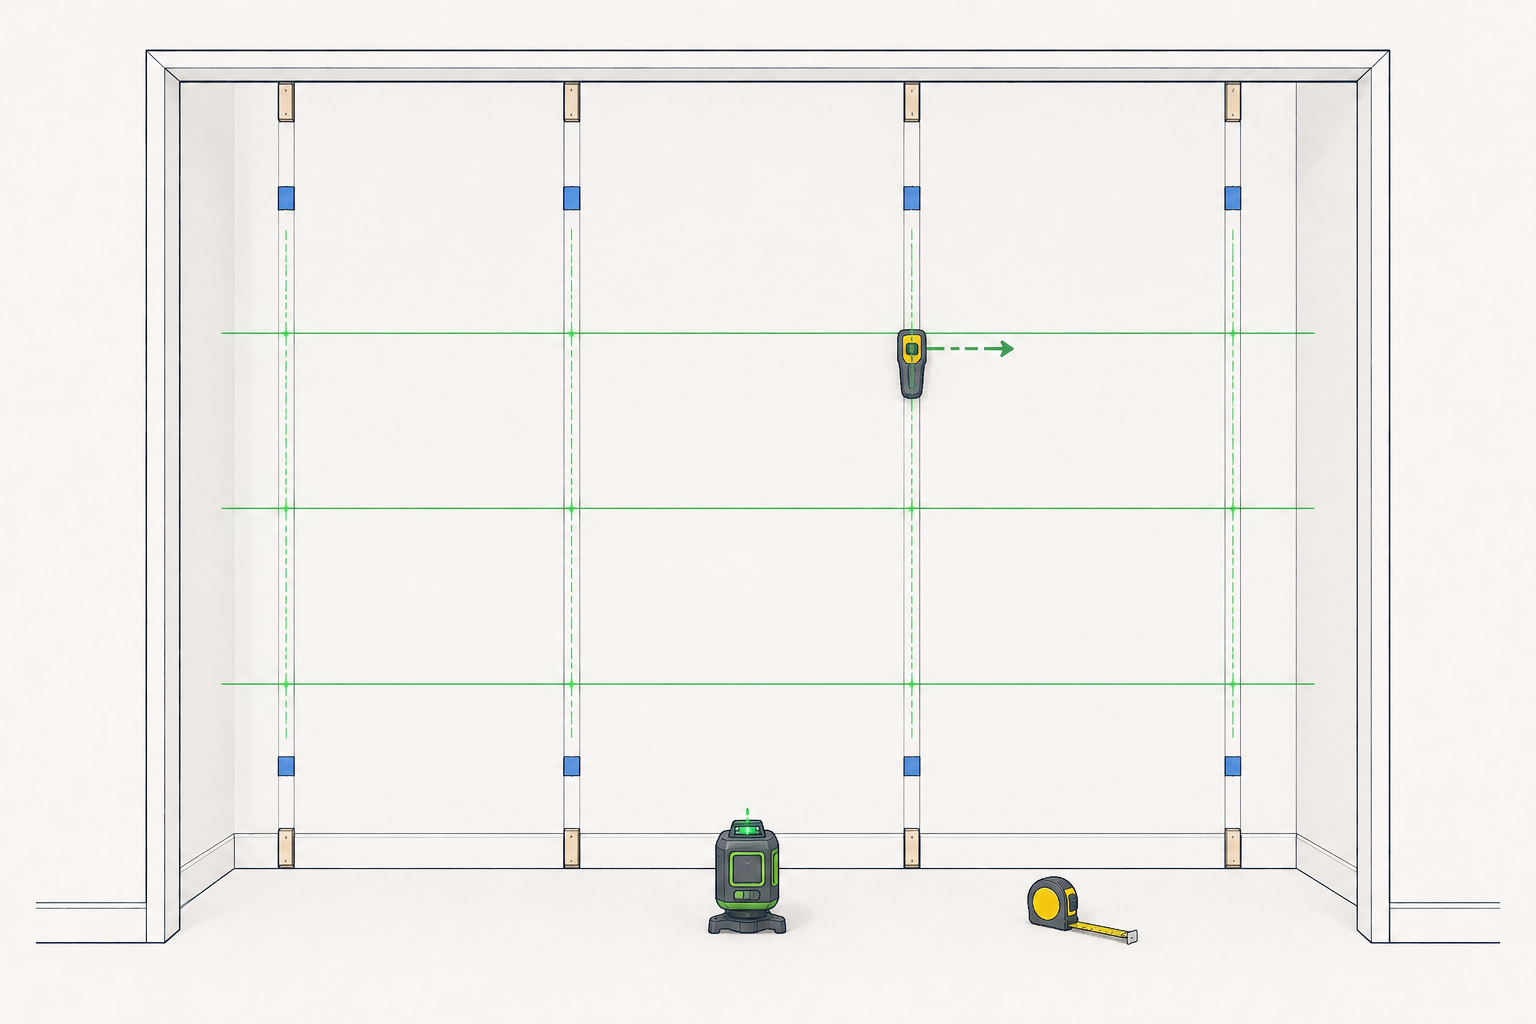
Locate and mark every usable stud on the back and side walls. Use a laser or long level to mark horizontal lines at 10, 38, and 80 inches above the finished floor.
Mark the planned upright positions and verify each 39-inch clear opening before installing fasteners.
Step 2: Install the outside uprights
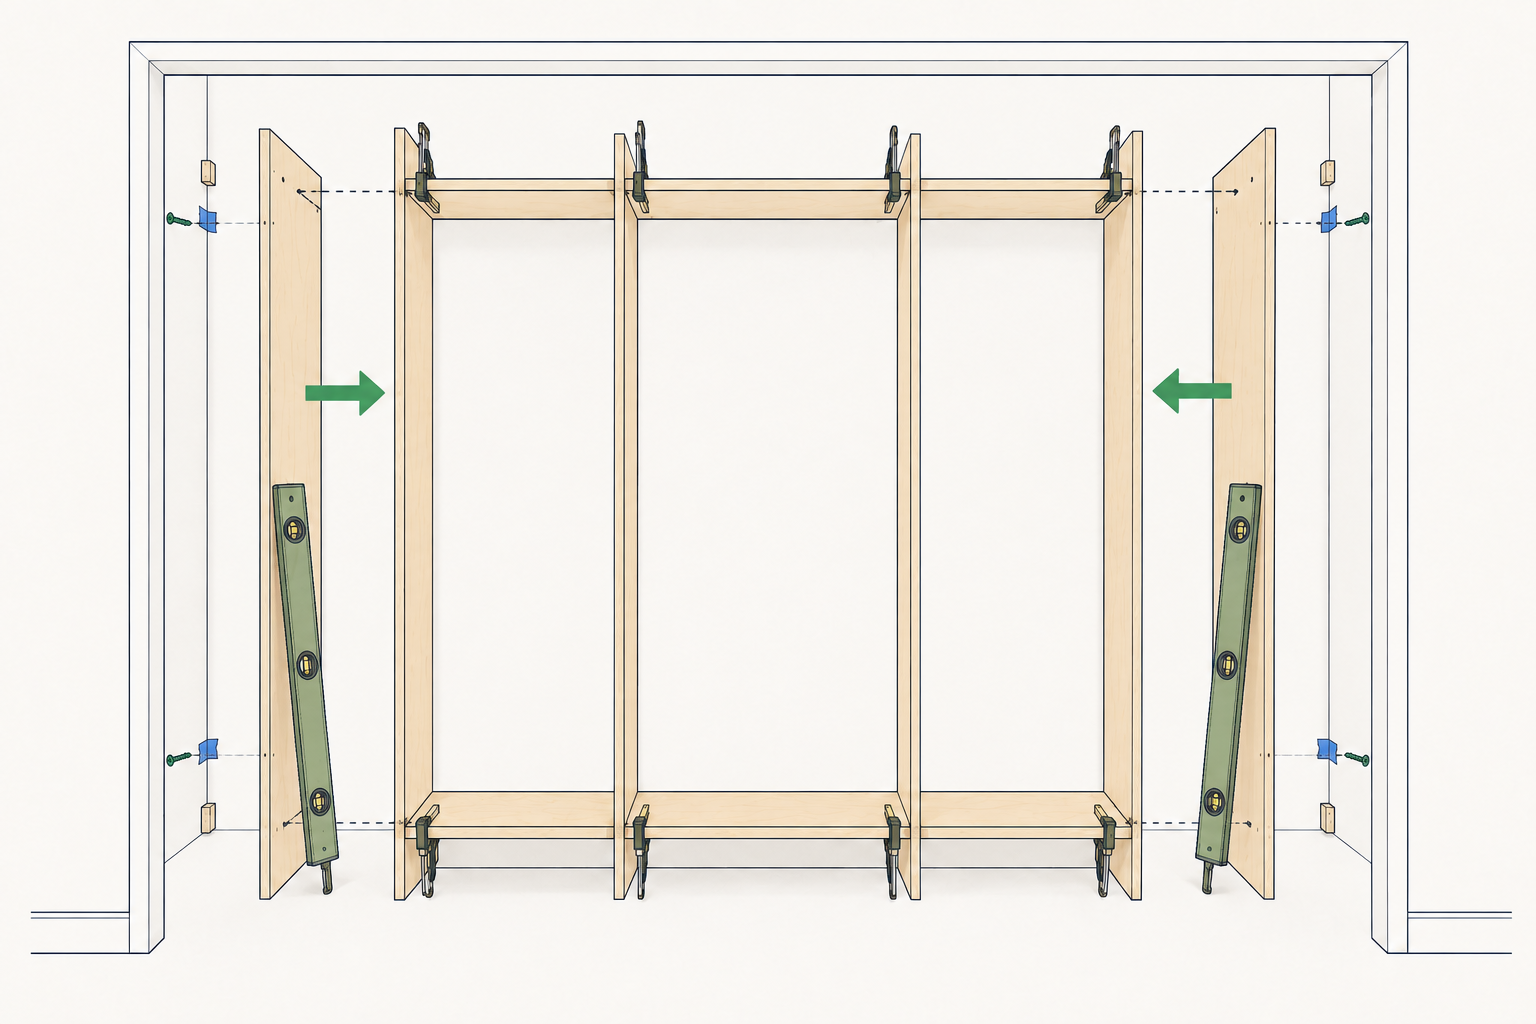
Place the left and right outside uprights against the side walls. Shim behind them as needed so both panels are plumb and their front edges are in the same plane.
Secure the uprights to wall studs with appropriate cabinet or structural screws. Do not rely on drywall anchors alone to support a loaded closet system.
Step 3: Install the two interior uprights
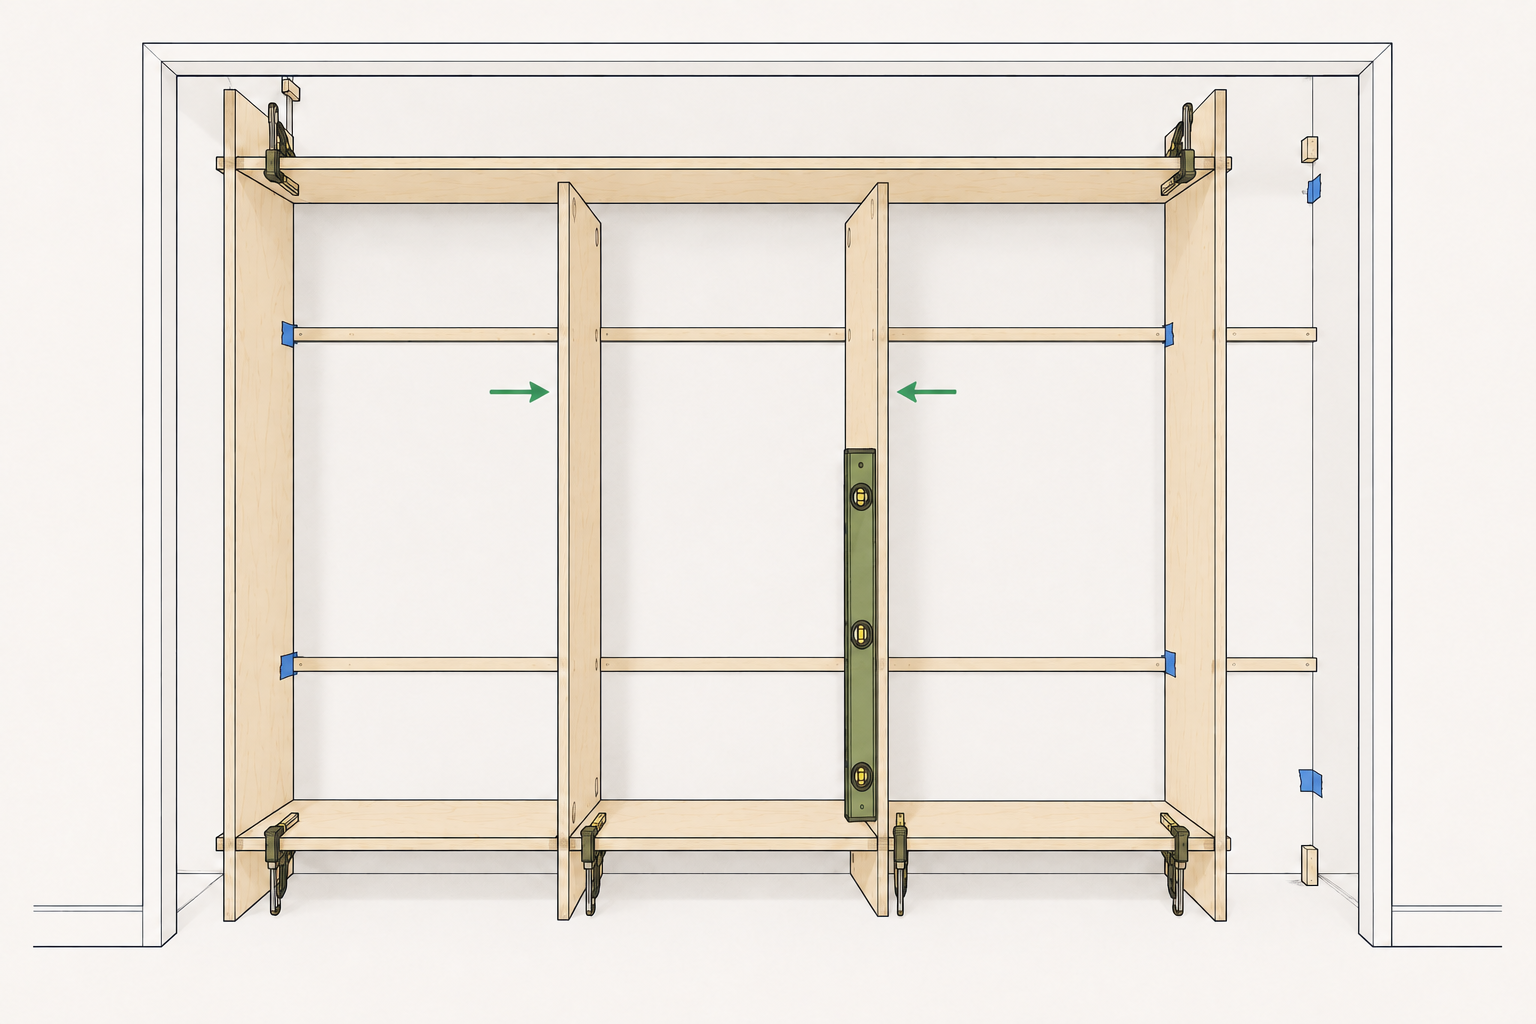
Position the first interior upright 39 inches from the inside face of the left upright. Position the second interior upright another 39 inches away.
Use temporary 39-inch spacer sticks or carefully measured shelf panels to maintain the opening widths. Check each divider for plumb before securing it to the back wall or a vertical wall cleat.
Do not permanently trap a shelf between panels until the entire layout has been checked for square.
Step 4: Add shelf supports
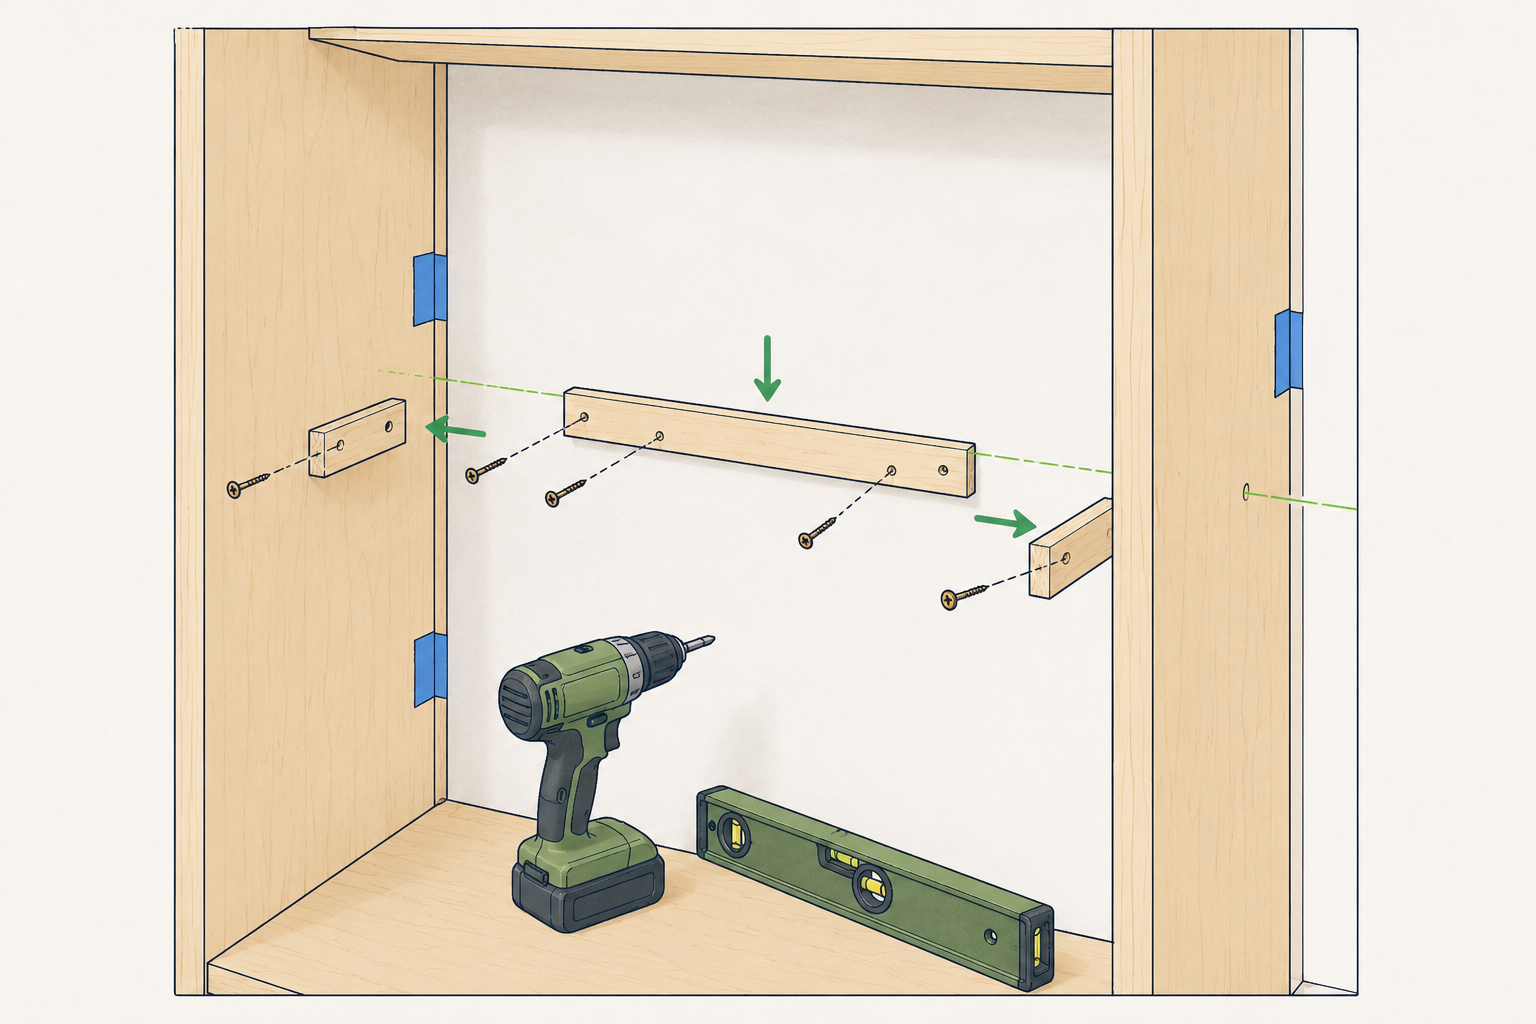
This plan works well with horizontal wall cleats placed beneath the back edge of each shelf. Side cleats, pocket screws, or confirmat screws can secure the shelf ends to the uprights.
The shelf cut sizes assume butt-fit or cleat-supported construction. If you decide to use dados, recalculate the shelf lengths to include the depth of the dados before cutting.
For a clean installation:
- Install the back cleats level at the marked elevations.
- Predrill all screw holes near plywood edges.
- Use glue only where future removal is not required.
- Stagger fasteners on opposite sides of shared interior uprights so the screws do not collide.
Step 5: Install the shoe shelves
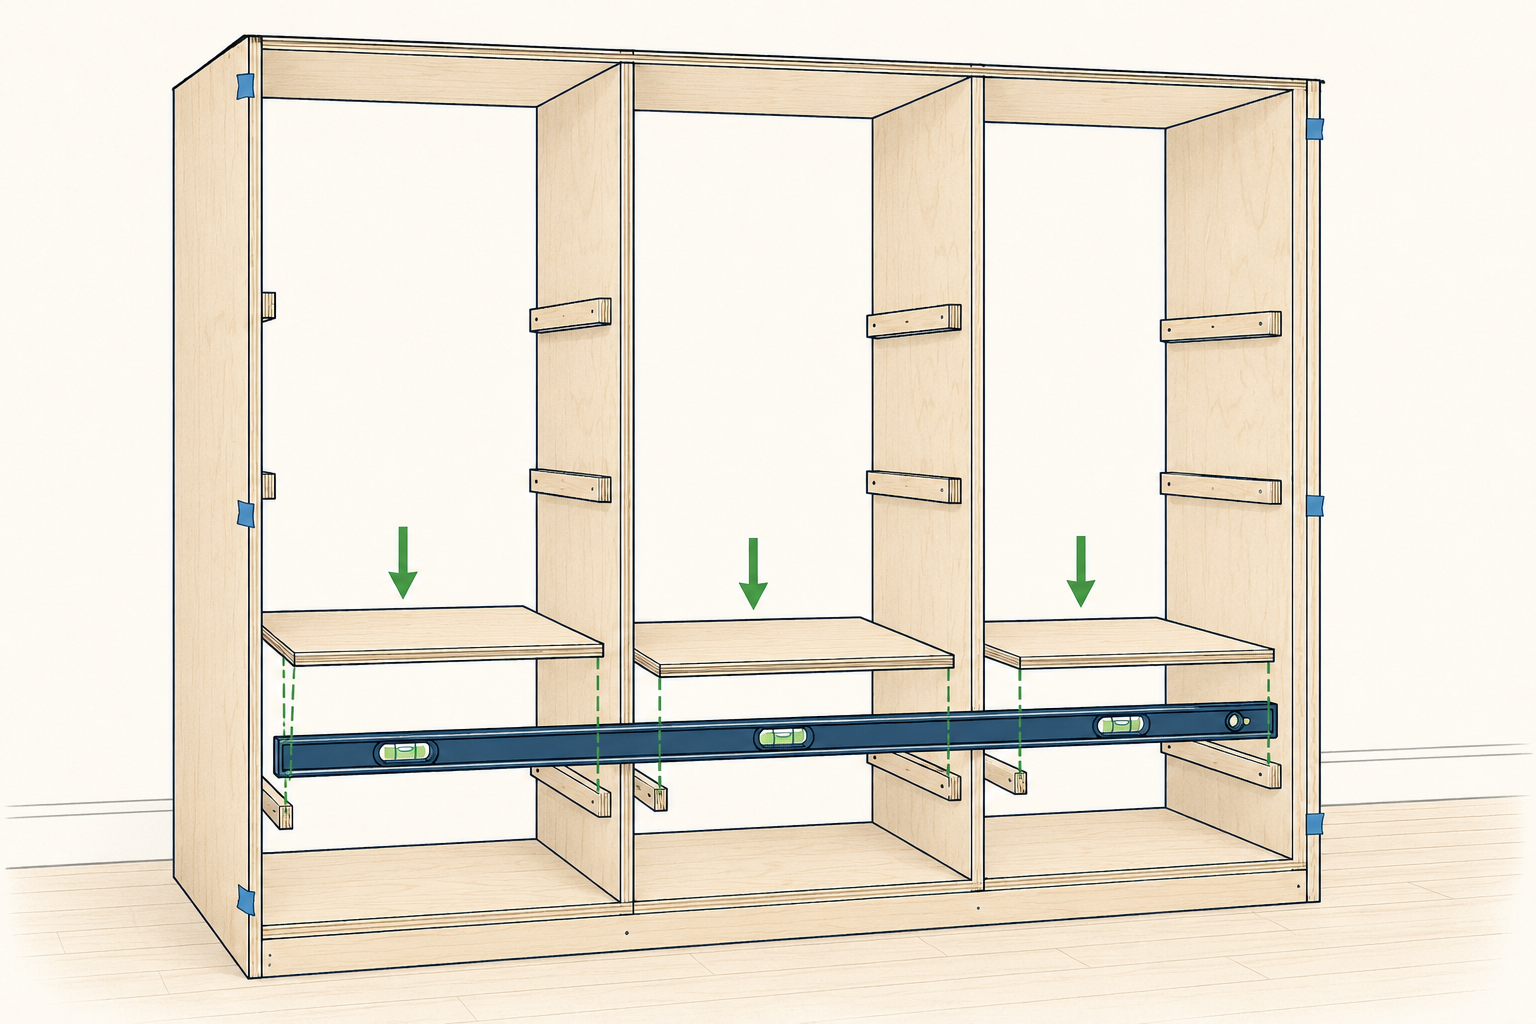
Install one 39-inch shelf in each bay with its top surface at 10 inches above the finished floor. Confirm that the three shelves form a visually level line across the closet.
The bottom zone can hold shoes and boots. If tall boots need more room, raise or omit the shelf in one bay before fastening it permanently.
Step 6: Install the right middle shelf
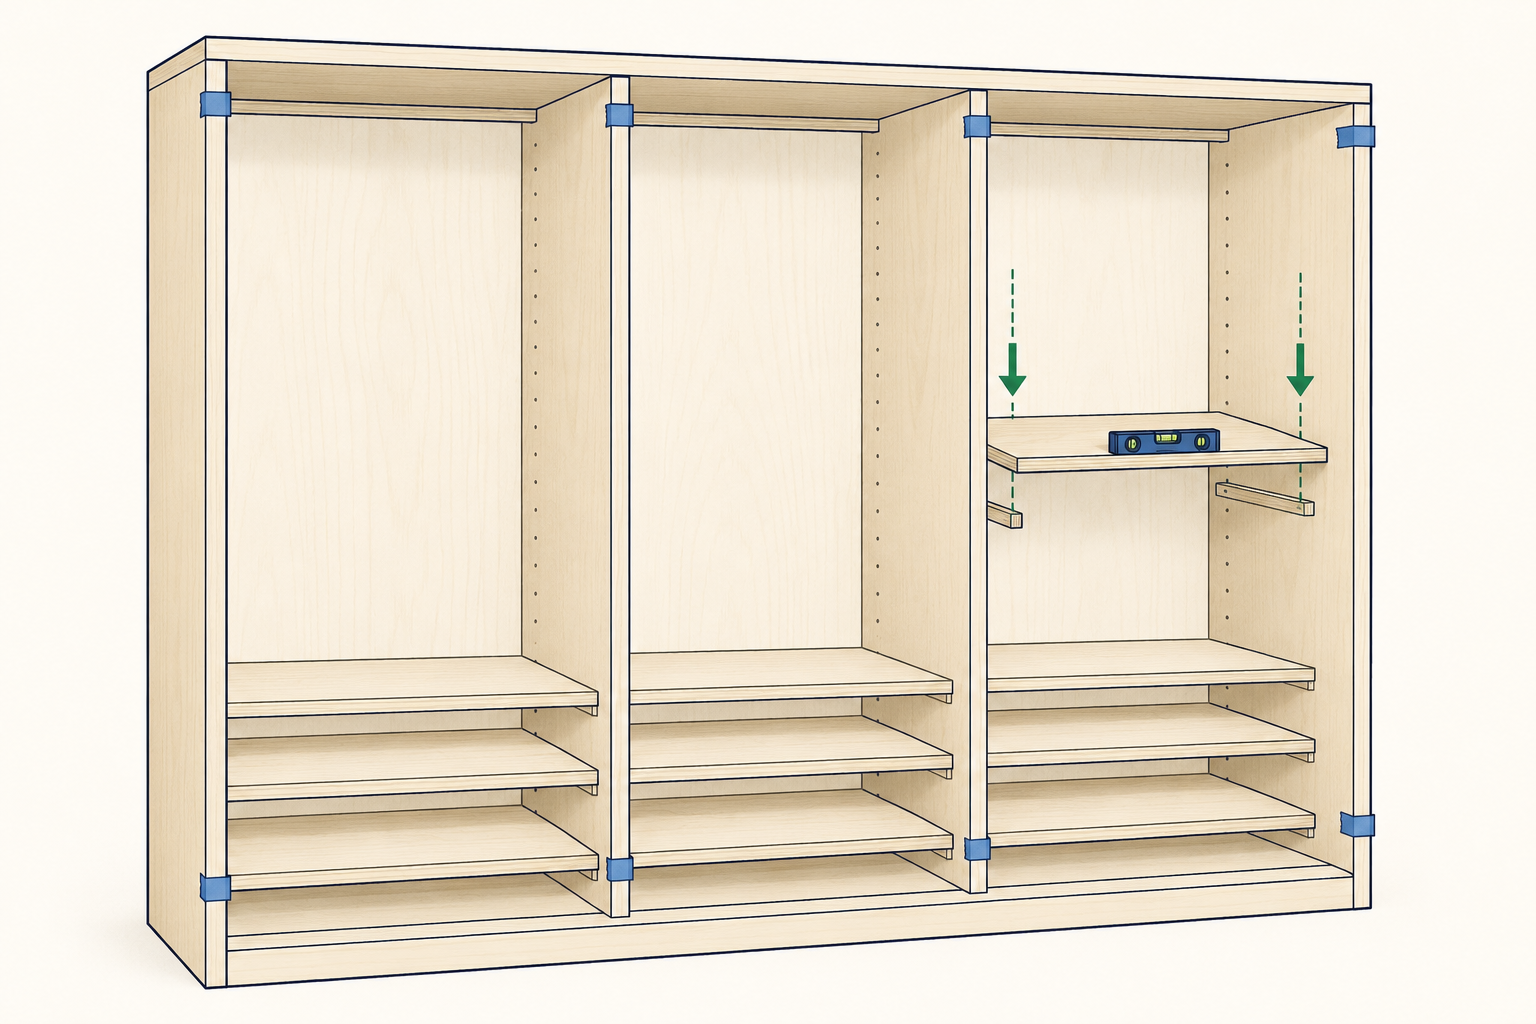
Install the middle shelf only in the right bay, with its top surface at 38 inches. This divides the right side into two short-hanging zones.
Check the clothing you intend to store before finalizing this position. The lower zone is intentionally compact and works best for short skirts, folded pants, children's clothing, or another shelf-based storage arrangement.
Step 7: Install the three upper shelves
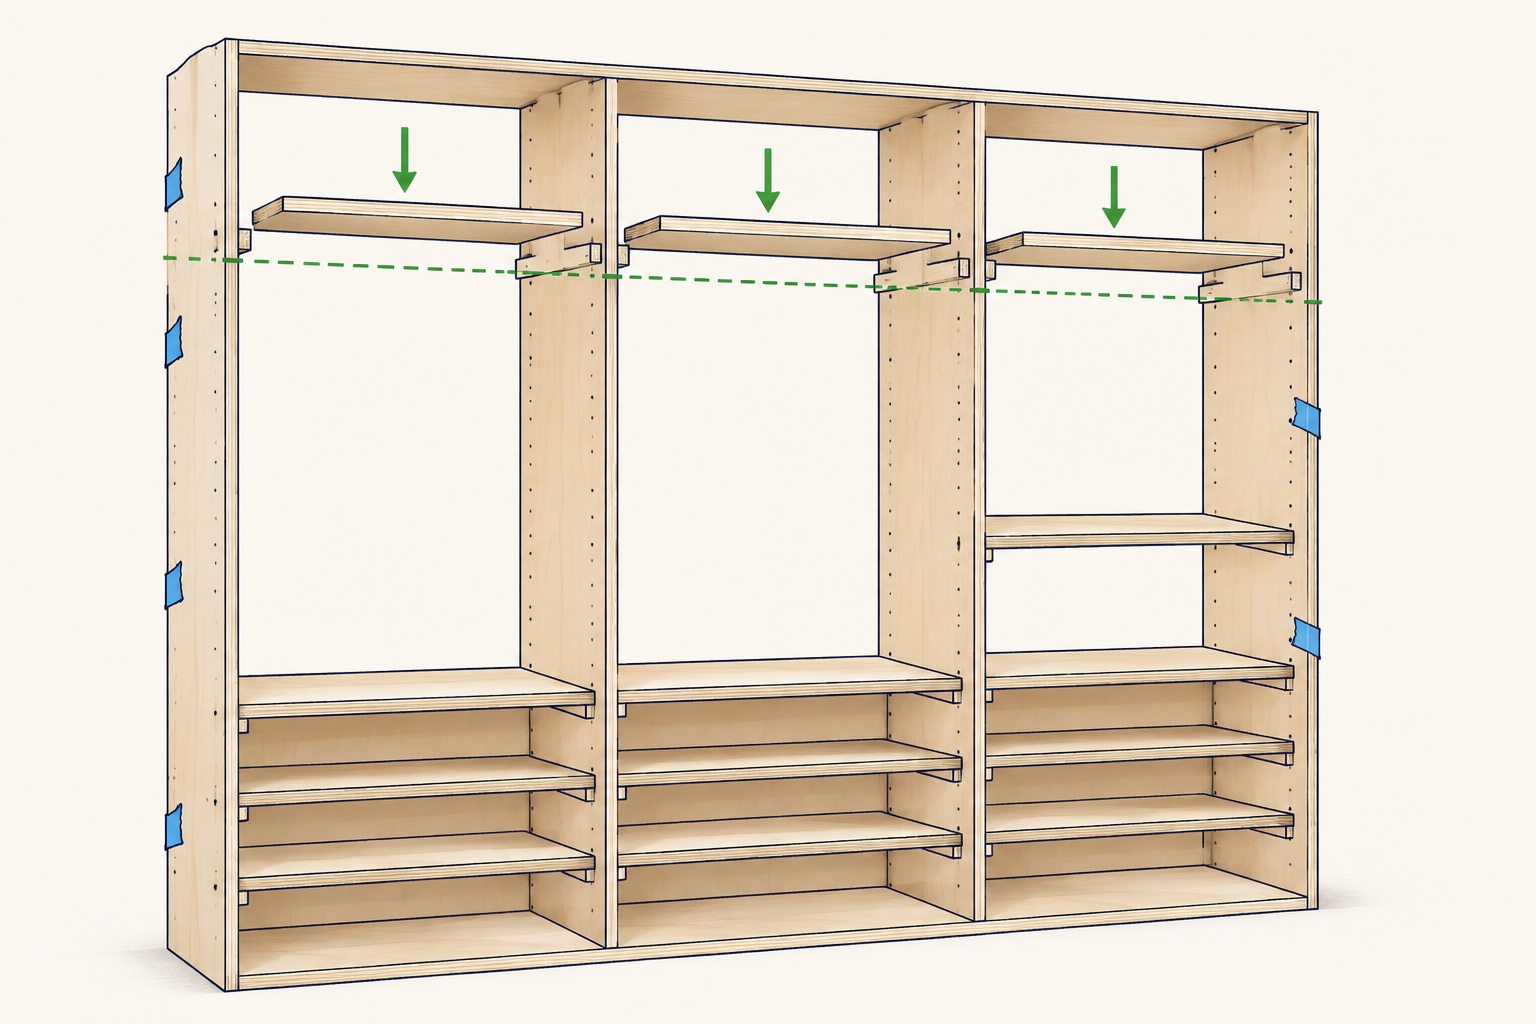
Install one shelf in each bay with its top surface at 80 inches. These shelves hold purses, hats, labeled bins, and seasonal accessories.
The 39-inch span is reasonable for 3/4-inch plywood when the shelf is secured at the sides and back. Add a hardwood or plywood front stiffener if the shelves will carry unusually heavy bins.
Step 8: Install the closet rods
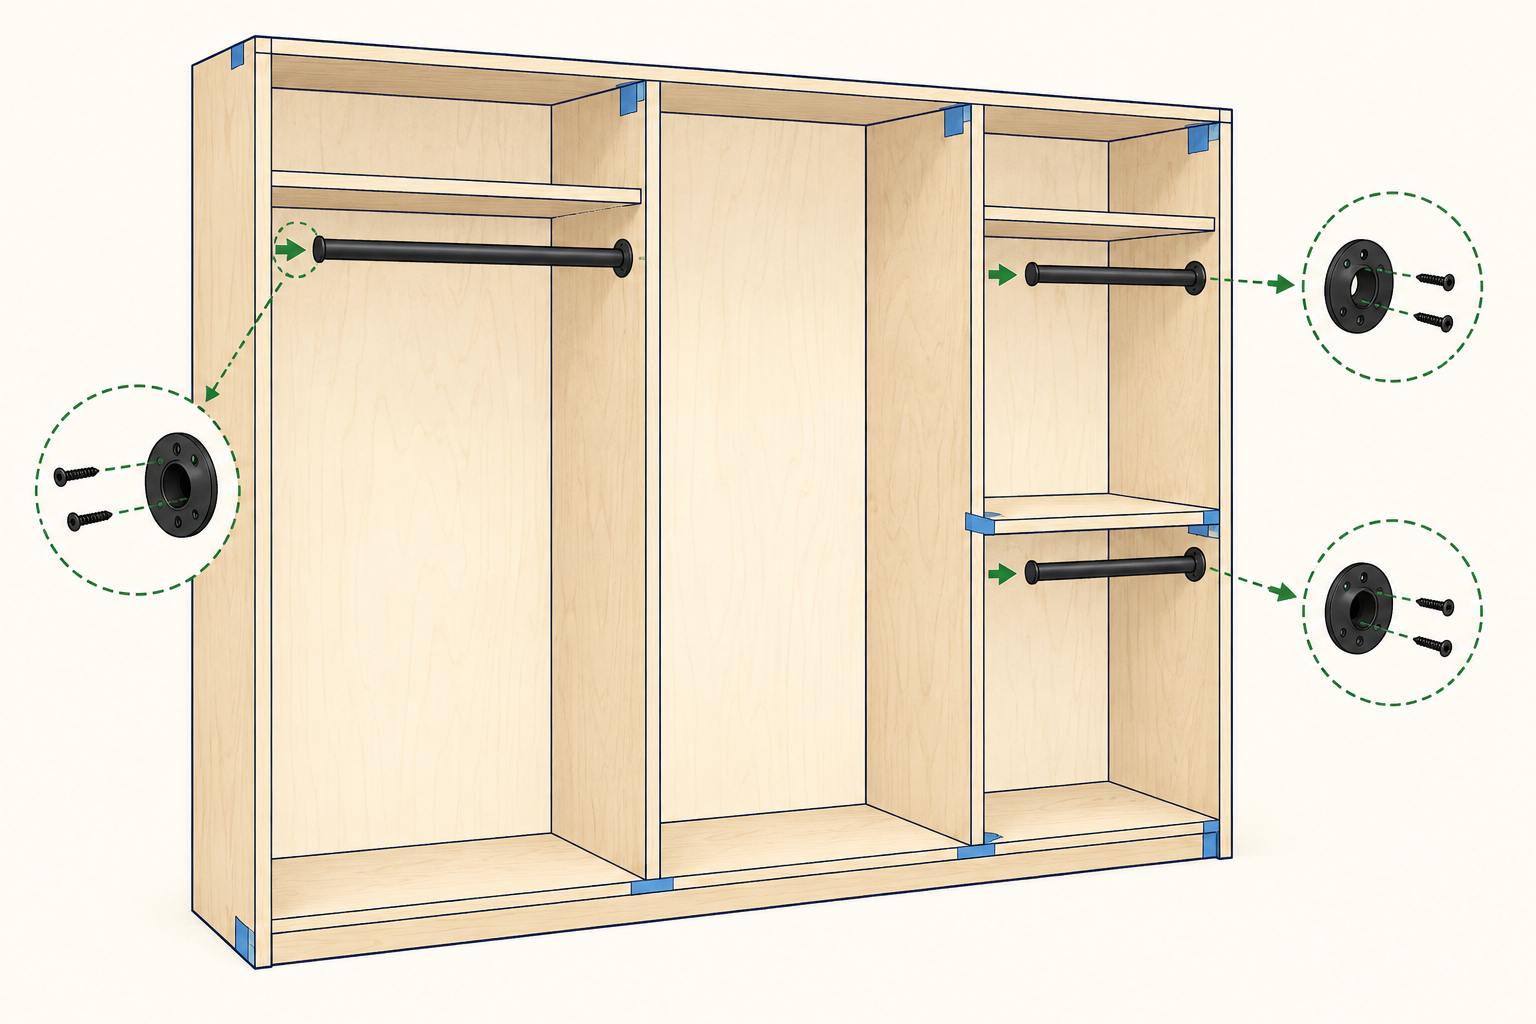
Install one rod in the left bay and two rods in the right bay. Center each rod approximately 12 inches from the back wall so standard hangers fit within the closet depth.
A useful starting point is to place each rod approximately 2 to 3 inches below the underside of the shelf above it. However, measure your actual clothing before drilling bracket holes. Dresses and long coats need more hanging length than shirts.
Measure between the installed plywood panels and cut each rod according to the socket manufacturer's required allowance.
Step 9: Add the center drawer unit and mirror
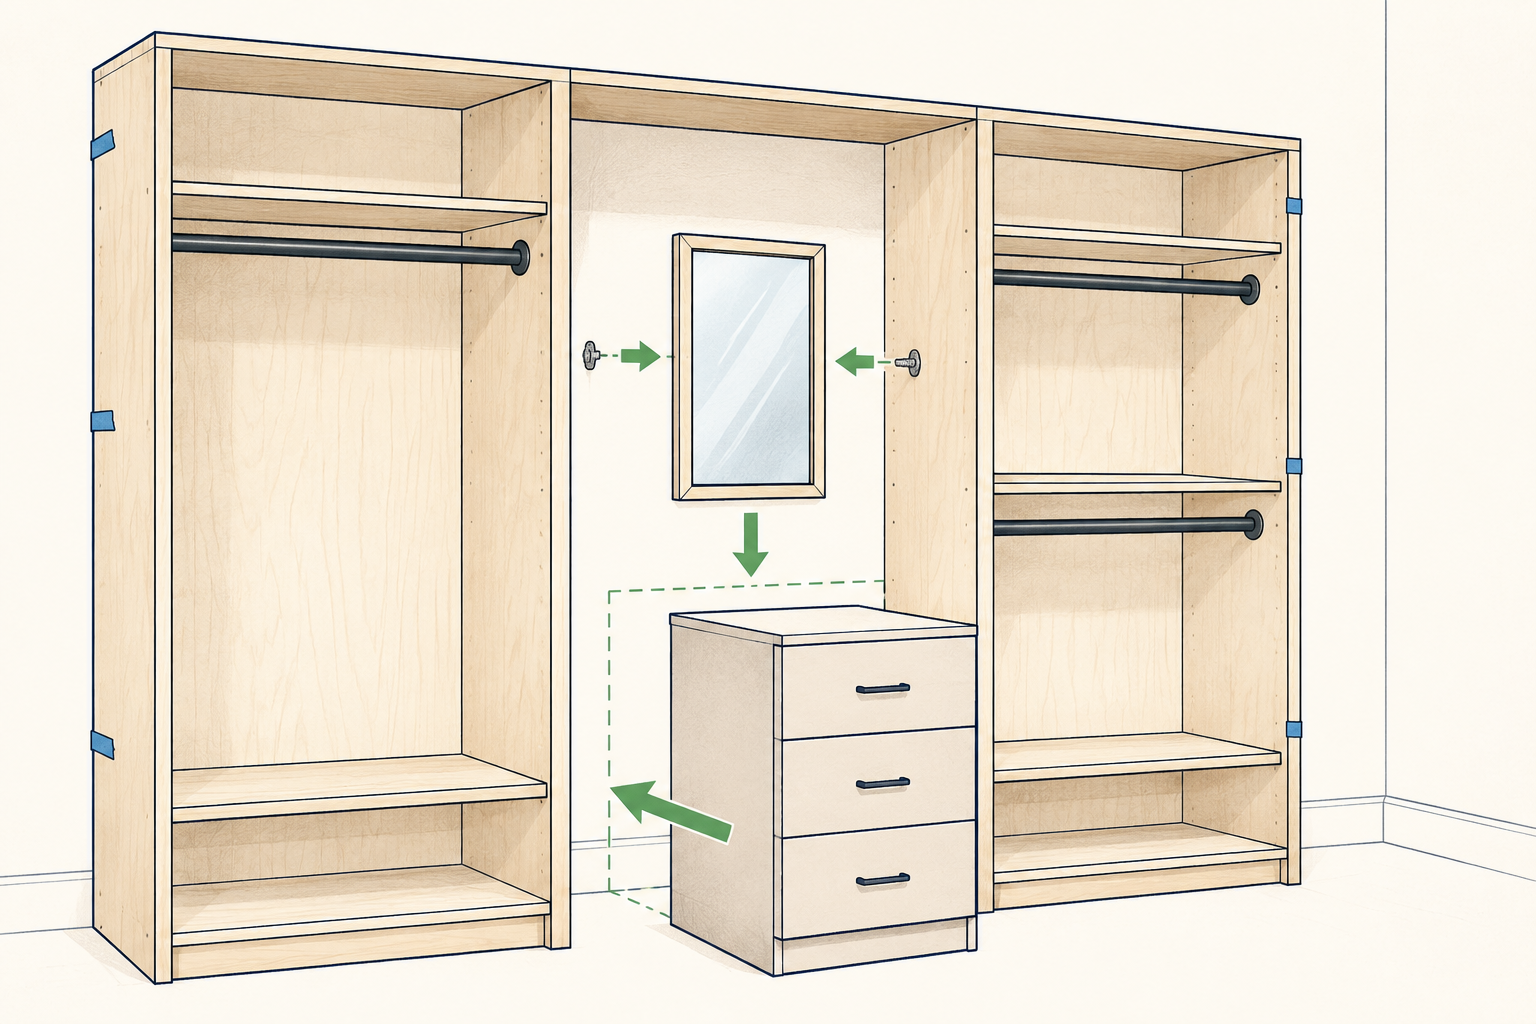
The center opening is 39 inches wide. Select or build a drawer unit that fits comfortably inside that clear opening, leaving room for installation and any face-frame overhang.
The drawer unit and its parts are intentionally excluded from this plywood cut list. Anchor the completed drawer unit according to its design, then install a properly secured mirror above it.
Step 10: Add trim and complete the finish
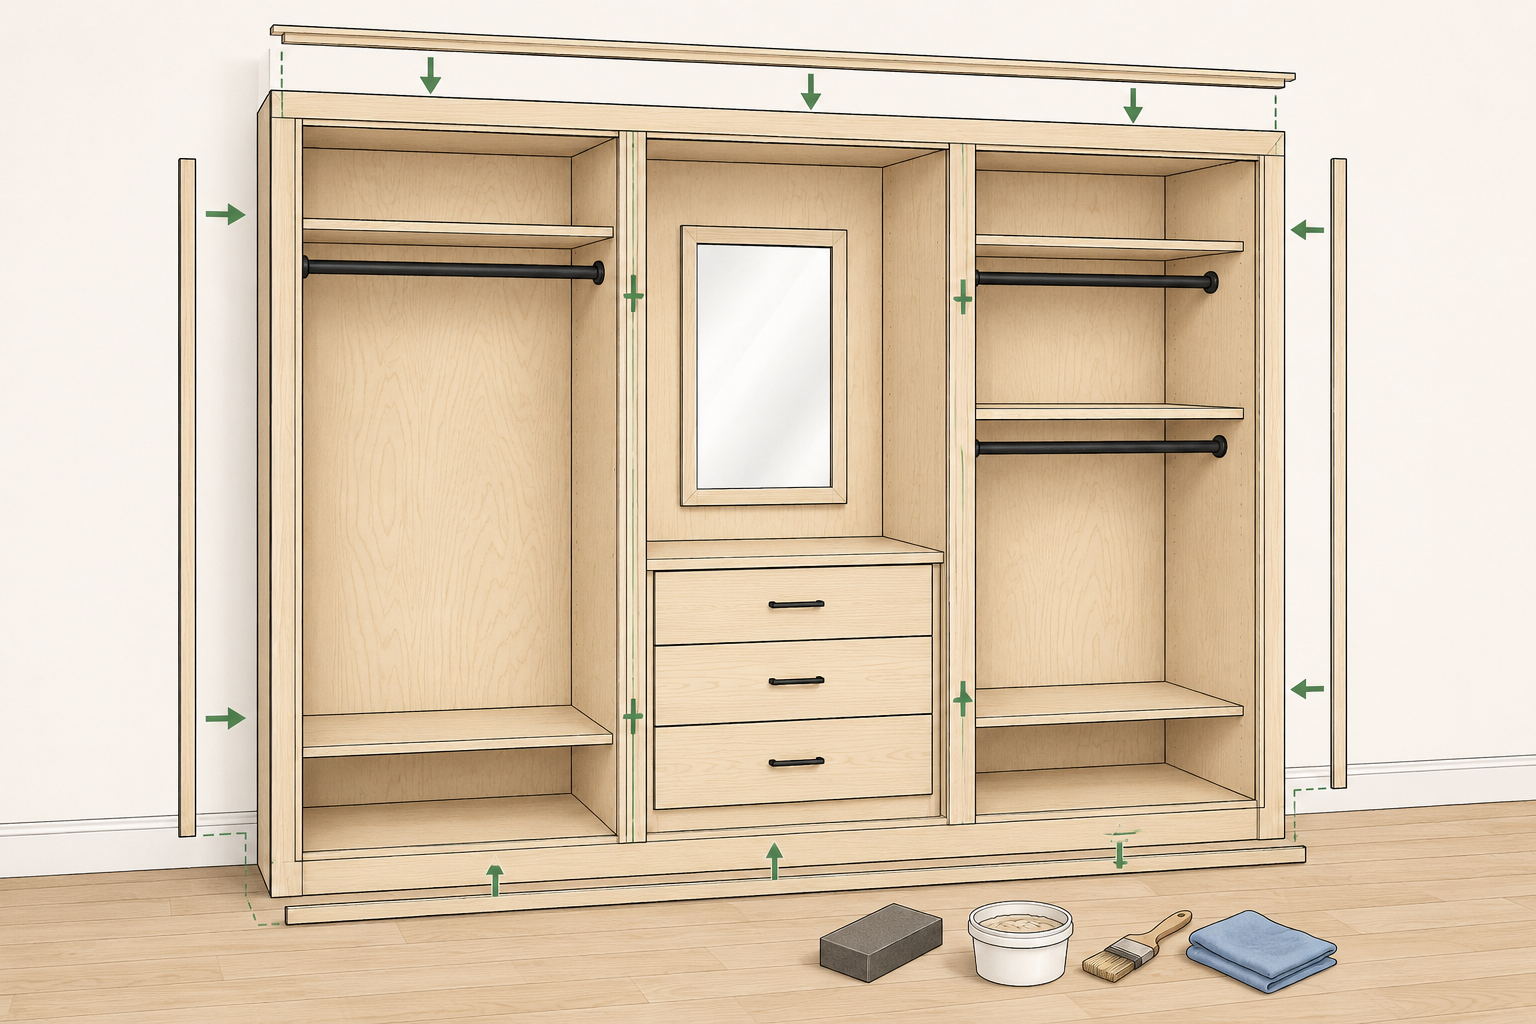
Fill visible fastener holes, touch up the finish, and add base or top trim if desired. Caulk only small paint-grade gaps; do not use caulk to conceal major alignment problems.
Allow finishes and adhesives to cure fully before loading the shelves or hanging clothing.
What Goes in Each Closet Section
Upper storage across all three bays
Use the upper shelves for lightweight items that are needed less often:
- Purses
- Hats
- Seasonal accessories
- Labeled storage bins
- Extra linens
Left long-hanging bay
Use the uninterrupted left section for:
- Dresses
- Long skirts
- Long coats
- Formalwear
- Garment bags
Center bay
The center section provides a dressing and small-item storage area:
- Mirror
- Drawer unit
- Jewelry organizers
- Folded accessories
Upper-right short-hanging section
Use the upper-right section for:
- Shirts
- Blouses
- Jackets
- Short coats
Lower-right short-hanging section
Use the lower-right section for:
- Short skirts
- Folded pants on clip hangers
- Children's clothing
- Additional shelf storage if hanging clearance is not needed
Lower shoe shelves
Use the bottom shelves for:
- Everyday shoes
- Boots
- Shoe boxes
- Small baskets
Common Mistakes to Avoid
Cutting every panel 24 inches deep
Two 24-inch strips do not fit across a 48-inch sheet after accounting for the blade kerf. Use 23 3/4 inches unless your sheet stock is wider than 48 inches.
Assuming the closet is perfectly square
Measure at several locations and dry-fit the parts. A 120-inch measurement at the floor does not guarantee the ceiling is also 120 inches wide.
Cutting 96-inch uprights before checking installation clearance
Verify the smallest ceiling height and make sure the panels can be tilted upright. Shorten the uprights slightly when necessary and cover the gap with trim.
Building one unsupported 10-foot shelf
Standard 4-by-8 plywood cannot produce a one-piece 10-foot shelf, and a long shelf would sag. This plan uses three individually supported 39-inch sections.
Ignoring grain direction
Inconsistent face-grain direction makes matching plywood panels look like different materials. Turn on Respect Wood Grain in CutListMaker and mark every part after cutting.
Fastening only to drywall
A loaded closet can be heavy. Secure uprights, cleats, rods, and drawer units to wall studs or other appropriate structure.
Forgetting to account for the chosen joinery
The 39-inch shelves are sized for clear openings and butt-fit or cleat-supported installation. Dados or other recessed joints may require longer shelves.
How to Customize the Plan
The same design can be adapted to a different closet width. If you want three equal bays with four 3/4-inch uprights, use this formula:
Clear bay width = (overall width - 3 inches) / 3
For unequal bays, the three clear widths must add up to the available 117 inches in a 120-inch opening.
For example, you could make the long-hanging section wider and the center bay narrower, provided the revised clear widths still total 117 inches. Enter every revised shelf length in CutListMaker and generate a new layout before cutting.
You can also customize the project by:
- Replacing the mirror with adjustable shelves
- Using the center bay as a second long-hanging section
- Adding a second shoe shelf
- Replacing the lower-right hanging zone with open shelving
- Adding doors or curtains after verifying clearances
- Using the optional spare panel as a future adjustable shelf
Frequently Asked Questions
Is four sheets of plywood really enough?
Yes. Four sheets are enough for four full-height uprights, seven installed shelves, and one optional spare shelf when every piece is 23 3/4 inches deep and the cut layout accounts for the blade kerf. A back, plywood top, plywood bottom, and drawer parts are not included.
Can I keep the closet exactly 24 inches deep?
Yes, but standard 48-inch-wide sheets cannot produce two exact 24-inch strips after the blade kerf is included. The project will use substantially more plywood unless you purchase wider sheet goods.
Does the center drawer unit need to be 39 inches wide?
No. The center bay has a 39-inch clear opening, so the drawer unit should be slightly narrower to allow installation clearance. Follow the drawer unit's construction requirements and hardware clearances.
Do I need a plywood back?
Not when the organizer is properly anchored to the existing wall and the wall provides a suitable finished background. Add a back only if you want a cabinet-style interior or the wall is unsuitable. A back panel would require additional plywood and a revised cut plan.
Can I use MDF instead of plywood?
MDF can produce a smooth painted finish, but it is heavier and more susceptible to sagging and moisture damage. If using MDF, add adequate shelf support and recalculate the material handling and fastening method.
Should I cut the optional extra panel?
Cutting it gives you a matching spare shelf for a future change. If you prefer larger scraps, leave the material uncut and use CutListMaker's Save Scraps option to record the remaining piece.
Plan the Cuts Before You Build
The difference between a smooth plywood project and an expensive mistake is often the planning that happens before the saw starts.
Open CutListMaker, enter the closet parts, set the kerf to match your blade, select your preferred cutting method, and generate a labeled sheet layout. Review the entire cutting sequence before breaking down the first sheet.
With four plywood sheets, careful field measurements, and an organized cut plan, you can build a 10-foot reach-in closet that uses the available space efficiently and gives every type of clothing a dedicated home.